Nodemcu
https://labka.cz/wiki/doku.php?id=project:nodemcu
NodeMCU
Last big news in area of cheap IoT devices is wireless microcontroller ESP8266 produced by chinnes manufaturer https://Espressif.com/ Espressif Systems. Initial idea was to build functinal UART bridge with WiFi for avaiable microcontrollers. Nevertheless, ESP8266 microcontroller based on procesosor 32-bit Tensilica Xtensa LX106 running on frequency 80 MHz with integrated WiFi Kit was designed and produced.
NodeMCU is open-source firmware and hardware developer kit, which speeds up IoT prototypes development in few lines of LUA scripts. NodeMCU firmware is made for chip ESP8266 WiFi SOC and brings LUA scripting environment based on eLua language. NodeMCU developer kit for ESP8266 implements GPIO, PWM, IIC, 1-Wirend a ADC on singleboard.
nodeMCU Firmware https://github.com/nodemcu/nodemcu-firmware Github
Developer Kit v1.0 https://github.com/nodemcu/nodemcu-devkit-v1.0 DevKit 1.0 Github
Hardware
NodeMCU hardware is equipped by microcontroller unit https://labka.cz/wiki/doku.php?id=project:esp8266 with embedded WiFi transceiver, as well by chip for communication on USB through serial port ‘USB to UART’ https://github.com/nodemcu/nodemcu-devkit-v1.0/blob/master/Documents/CP2102-9.pdf, Low-Noise LDO Voltage Regulator https://github.com/nodemcu/nodemcu-devkit-v1.0/blob/master/Documents/SPX3819M5-L-3-3.pdf, safe voltage drop with schottky barrier rectifier https://github.com/nodemcu/nodemcu-devkit-v1.0/blob/master/Documents/ss14.pdf and two buttons for reset ‘‘RST’’ and flash mode ‘‘FLASH’’ https://github.com/nodemcu/nodemcu-devkit-v1.0/blob/master/Documents/PTS820_4mar13-248116.pdf
Technical parameters
- CPU: 80/160 MHz Tensilica Xtensa LX106
- RAM: 64 KiB of instruction RAM, 96 KiB of data RAM
- Flash: 512M - 4M, depends on model of ESP8266
- Embedded WiFi transceiver
- 16 GPIO pins, SPI, I2C, I2S, UART, 10-bit ADC
Diagrams
https://github.com/nodemcu/nodemcu-devkit-v1.0/blob/master/NODEMCU_DEVKIT_V1.0.PDF documentation and drawings for each nodeMCU part is located on GitHub.
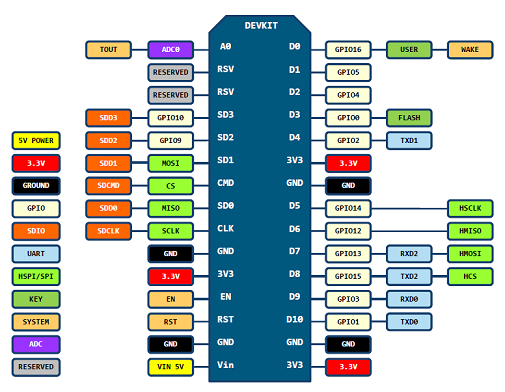
PIN Map
Important warnings
- Pin D0 (‘‘GPIO16’’) can be use only as //gpio// read/write and doesn’t support //interrupt/pwm/i2c/ow//.
- During each reboot, reset or wake activity pin ‘‘GPIO15’’ ‘‘MUST’’ be set to ‘‘LOW’’ and pin ‘‘GPIO2’’ ‘‘MUST’’ be set to ‘‘HIGH’’. Caution requires pin ‘‘GPIO0’’, when ‘‘GPIO0’’ is set to ‘‘HIGH’’ then boots into ‘‘RUN’’ mode. when ‘‘GPIO0’’ is set to ‘‘LOW’’ then boots into ‘‘FLASH’’ mode.
- If your intesion is use ‘‘SLEEP’’ mode, then interconnect pins ‘‘GPIO16’’ and ‘‘RST’’, and then ‘‘GPIO16’’ will be set to ‘‘LOW’’ after each wake activity.
Firmware
Programming nodeMCU requires programming model similiar to Node.js with exception of using LUA instead of JavaScript. Best practices is to select for programming models asynchronous and even-driven models.
NodeMCU Documentation https://github.com/nodemcu/nodemcu-firmware.
NodeMCU firmware can have various modules enabled, which extends capabilities of eLua language used in nodeMCU firmware. NodeMCU firmware is open-source and you can get compiled firmware several ways.
- Cloud service with firmware module wizard configuration https://nodemcu-build.com/
- Compile firmware in https://hub.docker.com/r/marcelstoer/nodemcu-build/
- Create your own linux build environment to compile firmware
- Download existing firmware(s) with modules from 3rd party vendors
IoT Infrastructure
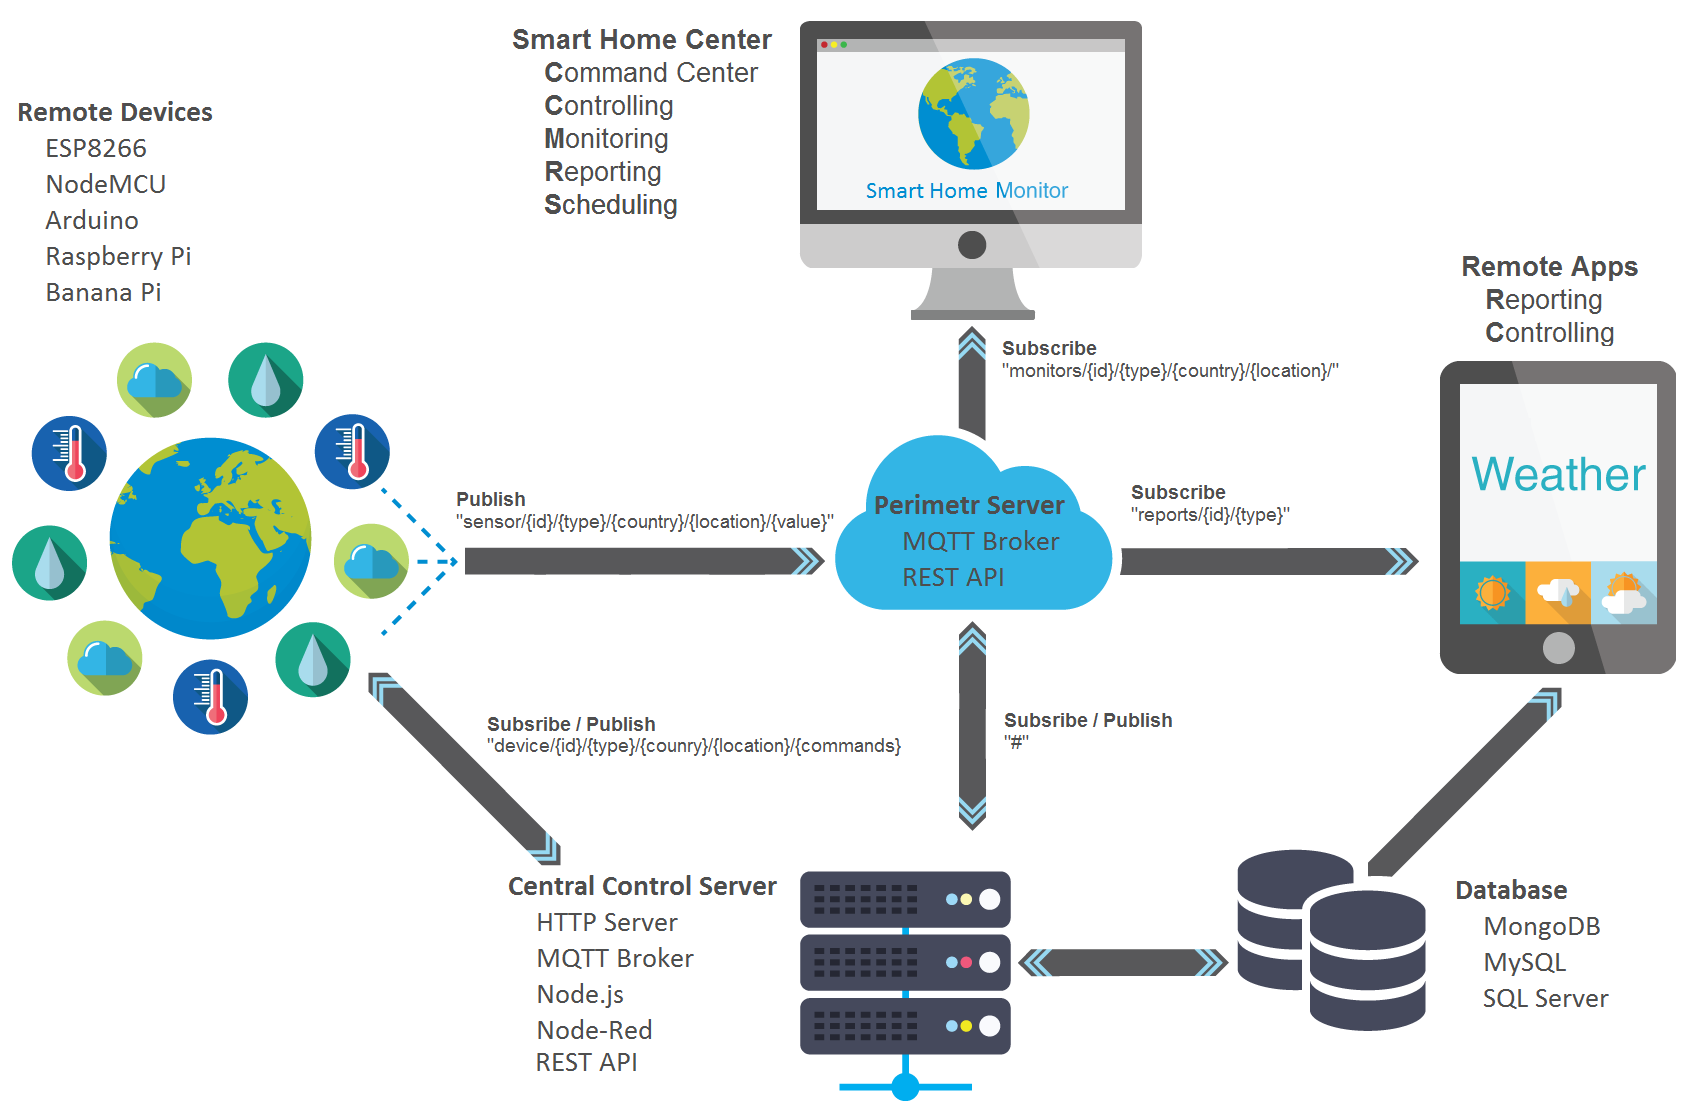
Let’s introduce initial idea about sensors data processing and controlling of remote devices. Main communicatin and controlling compoments are base on technologies ‘‘TCPIP’’, ‘‘MQTT’’ and ‘‘REST API’’.
NodeMCU Linux Build Environment
Installation and configuratin guide of required toolchain for successful compilation of nodeMCU firmware with ‘‘make’’ tool.
Original guide at http://www.esp8266.com/wiki/doku.php?id=toolchain
Linux build environemnt for nodeMCU firmware is based on Ubuntu Server.
Mini iso version will be enough for firmware compilation purpose. http://archive.ubuntu.com/ubuntu/dists/precise-updates/main/installer-amd64/current/images/netboot/mini.iso
In Ubuntu Installer select options “Basic Ubuntu Server” and “openSSH Server”
After reboot install software required by toolchain
sudo apt-get install build-essential zip gdb vim make unrar autoconf automake bison texinfo libtool mc gcc g++ gperf libc-dbg ncurses-dev expat lua5.1 lua5.1-doc luarocks gperf bison flex texinfo git help2man gawk python python-pip unzip screen python2.7 python-serial
for m in lua-bitlib luafilesystem md5 luaposix luasocket; do sudo luarocks install $m; done
sudo pip install mkdocs
Download ESP Open SDK from GitHub and run make
git clone --recursive https://github.com/pfalcon/esp-open-sdk

cd esp-open-sdk

make STANDALONE=y |& tee make0.log
| If running **make STANDALONE=y | & tee make0.log** makes error (missing application, etc.), then install missinf application and run **make STANDALONE=y | & tee make0.log** again. |
Open file ‘’~/.bashrc’’ for editing and add two lines at the end.
export PATH="$HOME/esp-open-sdk/xtensa-lx106-elf/bin/:$PATH"
alias xgcc="xtensa-lx106-elf-gcc"
Find the firmware version you want to compile on page with https://github.com/nodemcu/nodemcu-firmware/releases
Download and extract firmware source code
cd ~
wget https://github.com/nodemcu/nodemcu-firmware/archive/1.5.4.1-master_20161201.zip
unzip 1.5.4.1-master_20161201.zip -d nodemcu-firmware

# or

wget https://github.com/nodemcu/nodemcu-firmware/archive/2.0.0-master_20170202.zip
unzip 2.0.0-master_20170202.zip -d nodemcu-firmware
Navigate to firmware folder
cd ~/nodemcu-firmware/nodemcu-firmware-1.5.4.1-master_20161201
In file ‘‘user_modules.h’’ can enable or disable firmware modules with which will be compiled
mcedit app/include/user_modules.h
Run firmware compilation
make
Compiled bootloader and firmware is stored in folder bin, e.g.
-rw-rw-r--  1 node node  27872 Oct 26 11:21 0x00000.bin
-rw-rw-r--  1 node node 357683 Oct 26 11:21 0x10000.bin
Developer’s IDE for nodeMCU on Windows 10
Goal of this guide is to build Integrated Developement Environment (IDE) for work and development of nodeMCU solutions on operating system Windows 10.
Upload NodeMCU firmware
In previous sections we went through steps how to compile nodeMCU firmware. Now we need upload firmware into ESP8266. For this purpose are available virious scripts and programs on the internet. Here we describe tool for Windows written in Delphi https://github.com/nodemcu/nodemcu-flasher.
Enable ‘‘FLASH’’ mode before start uploading firmware. Flash mode can be enabled by pushing ‘‘FLASH’’ button on nodeMCU or before reboot set ‘‘GPIO0’’ pin to ‘‘LOW’’. https://labka.cz/wiki/doku.php?id=project:nodemcu:en#important_warnings
ESP8266 Flasher Tool
Project’s page on GitHub: https://github.com/nodemcu/nodemcu-flasher
Download from GitHub https://github.com/nodemcu/nodemcu-flasher
Opinion: Personally I am using on Windows 10 for work with GIT software https://github.com/git/git-scm.com
It is good to remeber where you downloaded ESP8266Flasher binaries from GitHub.
%PATHNODEMCUFLASHER%\Win64\Release\ESP8266Flasher.exe
Verify in Device Manager serial port number for communication with nodeMCUO.
%SYSTEMROOT%\System32\devmgmt.msc

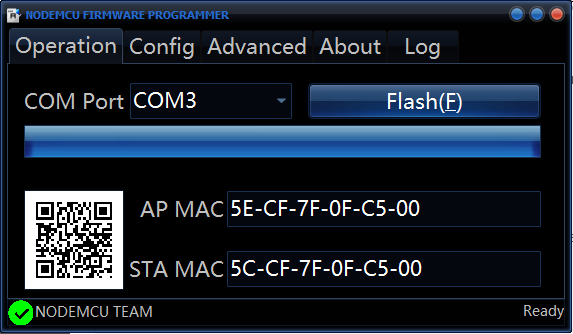
Procedure for uploading firmware
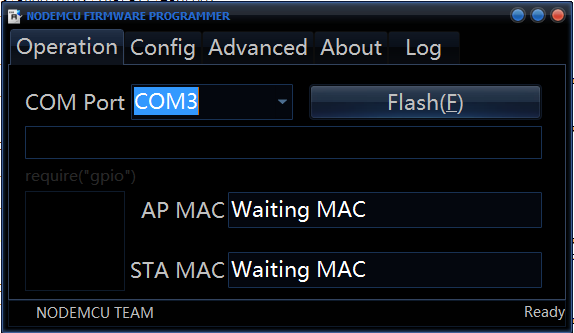
- Connect to serial port
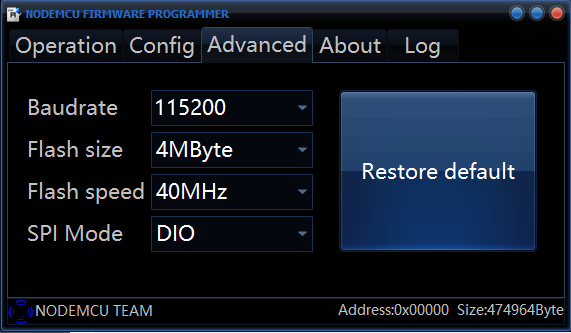
- Change setting for communication with ESP8266 Flasher
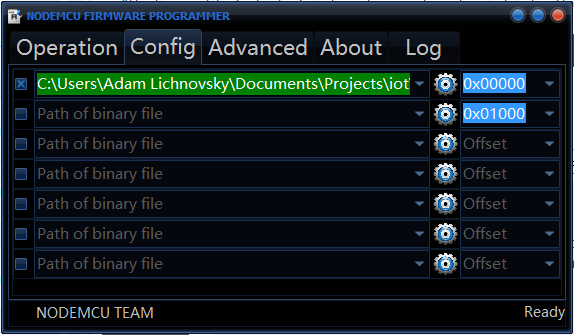
- Upload monolitic firmware //flash.bin// with ESP8266Flasher.exe to adress //0x00000//
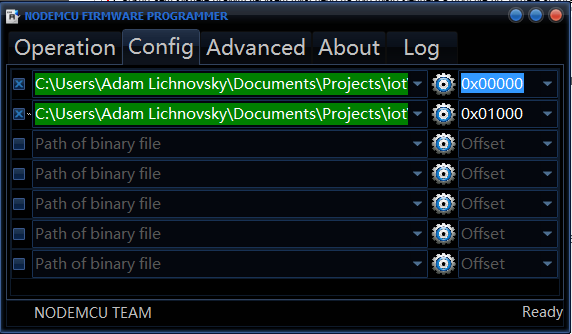
- Upload compiled bootloader //bin/0x00000.bin// to adress //0x00000// and firmware //bin/0x10000.bin// to adress //0x10000//
- Confirm previous steps to upload firmware to ESP8266
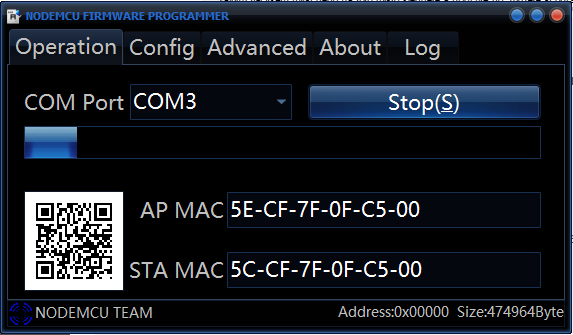
- Wait for success
Upload LUA skripts to ESP8266
Tools for uploading LUA scripts areavaile in big variety and tools are documented for example https://nodemcu.readthedocs.io/en/master/en/upload/
ESPlorer Tool====
ESPlorer is IDE for ESP8266, primary supporting LUA, MicroPython and sevel AT commands for ESP8266. ESPlorer requirers installed package JAVA Standard Edition verion 7 and higher.
Project’s page on GitHub: https://github.com/4refr0nt/ESPlorer
Download ESPlorer http://esp8266.ru/esplorer/#download
Supported platforms:
- Windows(x86, x86-64)
- Linux(x86, x86-64, ARM soft & hard float)
- Solaris(x86, x86-64)
- Mac OS X(x86, x86-64, PPC, PPC64)
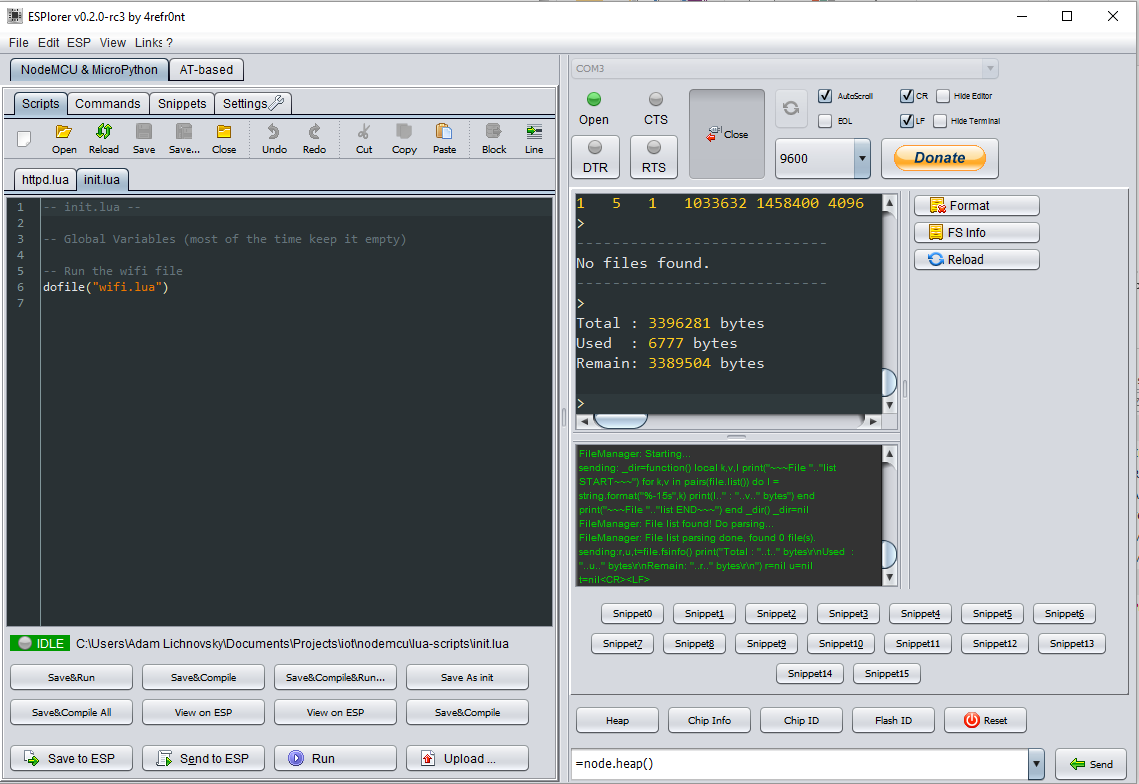
Output from ESPlorer console
> =node.heap()
45264
>
Install MongoDB Server
For Datastorage engin with communication with Node.js was choosen MondoDB. MongoDB is a free and open-source cross-platform document-oriented database program. Classified as a NoSQL database program, MongoDB uses JSON-like documents with schemas. MongoDB is developed by MongoDB Inc. and is free and open-source, published under a combination of the GNU Affero General Public License and the Apache License.
Original install guide is https://docs.mongodb.com/manual/tutorial/install-mongodb-on-windows/
- First download isntallation package https://fastdl.mongodb.org/win32/mongodb-win32-x86_64-2008plus-ssl-3.2.10-signed.msi
- Install mongodb-win32-x86_64-2008plus-ssl-3.2.10-signed.msi package
- Add install MongoDB path to system variable PATH
PS C:\> $env:path += ";" + "C:\Program Files\mongodb\Server\3.2\bin"
PS C:\> [Environment]::SetEnvironmentVariable("PATH", $env:path, "Machine")
- Create folders for databases
PS C:\> New-Item -ItemType "directory" -Path c:\data -Force
PS C:\> New-Item -ItemType "directory" -Path c:\data\db -Force
- Create folders for logs
PS C:\> New-Item -ItemType "directory" -Path "c:\data\log" -Force
- Create log file
PS C:\> New-Item -ItemType "file" -Path "c:\data\log\mongo.log" -Force
- Create MongoDB configuration file
PS C:\> New-Item -ItemType "file" -Path "C:\Program Files\MongoDB\Server\3.2\bin\mongod.cfg" -Force
PS C:\> $MONGODBCONF = "systemLog:`n    destination: file`n    path: c:\data\log\mongo.log`nstorage:`n    dbPath: c:\data\db"
PS C:\> $MONGODBCONF | Out-File -FilePath "C:\Program Files\MongoDB\Server\3.2\bin\mongod.cfg" -Append
PS C:\> more "C:\Program Files\MongoDB\Server\3.2\bin\mongod.cfg"
systemLog:
    destination: file
    path: C:\Data\log\mongod.log
storage:
    dbPath: C:\Data\db
- Create MongoDB service
PS C:\> Invoke-Expression "& `"C:\Program Files\MongoDB\Server\3.2\bin\mongod.exe`" --config `"C:\Program Files\MongoDB\Server\3.2\bin\mongod.cfg`" --install"
For semi-automated I wrote in PowerShell 5 https://github.com/lichnak/nodemcu-labka/blob/master/doc/wiki/cs/InstallMongoDB.ps1 MongoDb Installation PowerShell Script
Install Node.js
http://nodejs.org/ is an open-source, cross-platform JavaScript runtime environment for developing a diverse variety of server tools and applications. Although Node.js is not a JavaScript framework,[4] many of its basic modules are written in JavaScript, and developers can write new modules in JavaScript. The runtime environment interprets JavaScript using Google’s V8 JavaScript engine.
Project documenation of https://nodejs.org/download/release/latest/docs/api/
Warning: If you use node.js version v7.1.0, it is recommended to reinstall node.js to version v7.0.0. Node.js v7.1.0 has know error on Windows platform, error causes node.js to crash when you use for node.js consoles Powershell or CMD.
- Download 64-bit verion of Node.js (32-bit is for hipsters) https://nodejs.org/download/release/v7.0.0/node-v7.0.0-x64.msi
- Install ‘‘node-v7.0.0-x64.msi’’ package, deafault install path is ‘‘C:\Program Files\nodejs’’
- If you didn’t select option ‘‘Add PATH’’, then add node.js install path to system variable ‘‘PATH’’
- Now that the ‘‘PATH’’ variable is set correctly, you will still encounter errors. Manually go into the AppData directory and you will find that there is no npm directory inside Roaming. Manually create this directory.
PS C:\> $NPMPATH = $Env:USERPROFILE + "\AppData\Roaming\npm"
PS C:\> New-Item -ItemType "directory" -Path $NPMPATH
PS C:\> $Env:PATH += ";" + $NPMPATH + ";C:\Program Files\nodejs"
PS C:\> [Environment]::SetEnvironmentVariable("PATH", $Env:PATH, "Machine")
Install Python
Next steps are to install Python in version 2.7, because node.js package node-gyf is dependent on Python2.7 and haven’t started to support Pyhthon v3.x.x yet.
- Download 64-bit verion of https://www.python.org/downloads/windows/download
- Install ‘‘python-2.7.12.amd64.msi’’ package
- Select default installation options and add Python install path to system variables ‘‘PATH’’ and ‘‘PYTHON’’
PS C:\> $Env:PATH += ";C:\Program Files\Python27"
PS C:\> [Environment]::SetEnvironmentVariable("PATH", $Env:PATH, "Machine")
PS C:\> [Environment]::SetEnvironmentVariable("PYTHON", "C:\Program Files\Python27", "Machine")
- Setup Node.js for installed Python version
  PS C:\> cd "C:\Program Files\nodejs\"
PS C:\Program Files\nodejs> cmd
Microsoft Windows [Version 10.0.14393]
(c) 2016 Microsoft Corporation. Všechna práva vyhrazena.

C:\Program Files\nodejs>npm config set python "C:\Program Files\Python27\python.exe"
C:\Program Files\nodejs>exit
PS C:\Program Files\nodejs>
Install Node-Red
To aviod dependency conflicts first step is to install Microsoft compilator ‘‘windows-build-tools’’ for Node.js packages. And sedcond step is now to install rest of Node-Red dependency packages.
PS C:\> cd "C:\Program Files\nodejs\"
PS C:\Program Files\nodejs> cmd
Microsoft Windows [Version 10.0.14393]
(c) 2016 Microsoft Corporation. Všechna práva vyhrazena.

C:\Program Files\nodejs>npm install -g --production windows-build-tools
C:\Program Files\nodejs>npm install -g node-gyp
C:\Program Files\nodejs>npm install -g bindings
C:\Program Files\nodejs>npm install -g bcrypt
C:\Program Files\nodejs>npm install -g bson
C:\Program Files\nodejs>npm install -g bufferutil
C:\Program Files\nodejs>npm install -g kerberos
C:\Program Files\nodejs>npm install -g mqtt
C:\Program Files\nodejs>npm install -g mongodb
C:\Program Files\nodejs>npm install -g nan
C:\Program Files\nodejs>npm install -g node-sass
C:\Program Files\nodejs>npm install -g options
C:\Program Files\nodejs>npm install -g phantomjs
C:\Program Files\nodejs>npm install -g pm2
C:\Program Files\nodejs>npm install -g pm2-windows-startup
C:\Program Files\nodejs>npm install -g sqlite3
C:\Program Files\nodejs>npm install -g ultron
C:\Program Files\nodejs>npm install -g utf-8-validate
C:\Program Files\nodejs>npm install -g ws
C:\Program Files\nodejs>exit
PS C:\Program Files\nodejs>
Configuration of package pm2-windows-startup
PS C:\> cd "C:\Program Files\nodejs\"
PS C:\Program Files\nodejs> cmd
Microsoft Windows [Version 10.0.14393]
(c) 2016 Microsoft Corporation. Všechna práva vyhrazena.

C:\Program Files\nodejs>pm2-startup install
C:\Program Files\nodejs>pm2 save
C:\Program Files\nodejs>exit
PS C:\Program Files\nodejs>
Install Node-Red
PS C:\> cd "C:\Program Files\nodejs\"
PS C:\Program Files\nodejs> cmd
Microsoft Windows [Version 10.0.14393]
(c) 2016 Microsoft Corporation. Všechna práva vyhrazena.

C:\Program Files\nodejs>npm install -g node-red
C:\Program Files\nodejs>npm install -g node-red-dashboard
C:\Program Files\nodejs>exit
PS C:\Program Files\nodejs>
Start Node-Red
PS C:\> cd "C:\Program Files\nodejs\"
PS C:\Program Files\nodejs> cmd
Microsoft Windows [Version 10.0.14393]
(c) 2016 Microsoft Corporation. Všechna práva vyhrazena.

C:\Program Files\nodejs>node "%USERPROFILE%\AppData\Roaming\npm\node_modules\node-red\red.js"
C:\Program Files\nodejs>exit
PS C:\Program Files\nodejs>
Configure Node-Red for automatic start
PS C:\> cd "C:\Program Files\nodejs\"
PS C:\Program Files\nodejs> cmd
Microsoft Windows [Version 10.0.14393]
(c) 2016 Microsoft Corporation. Všechna práva vyhrazena.

C:\Program Files\nodejs>pm2 start "%USERPROFILE%\AppData\Roaming\npm\node_modules\node-red\red.js"
C:\Program Files\nodejs>pm2 save
C:\Program Files\nodejs>exit
PS C:\Program Files\nodejs>
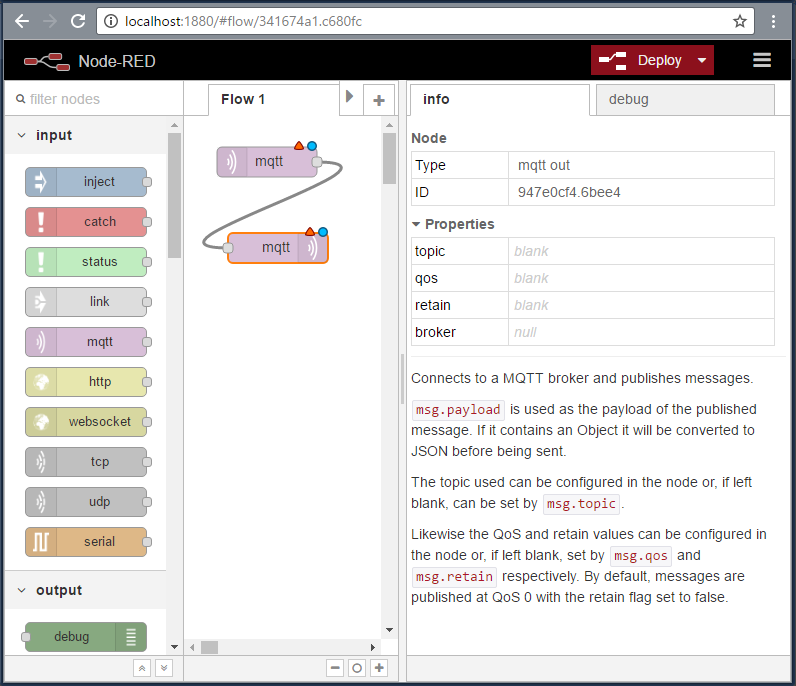
Now your can find your Node-RED editor installation at http://localhost:1880
Install Mosquitto MQTT Broker
For role MQTT Brokera in IDE was chosen software Mosquitto.
- First download installation files for https://slproweb.com/download/Win32OpenSSL_Light-1_0_2j.exe http://mirror.ibcp.fr/pub/eclipse//mosquitto/binary/win32/mosquitto-1.4.10-install-win32.exe and library ftp://sources.redhat.com/pub/pthreads-win32/dll-latest/dll/x86/pthreadVC2.dll
- Install OpenSSL package ‘‘Win32OpenSSL_Light-1_0_2j.exe’’
- Install Mosquitto package ‘‘mosquitto-1.4.10-install-win32.exe’’
- Copy library ‘‘pthreadVC2.dll’’ to Mosquitto install folder.
PS C:\> dir "C:\Program Files (x86)\mosquitto\pthreadVC2.dll"


    Directory: C:\Program Files (x86)\mosquitto


Mode                LastWriteTime         Length Name
----                -------------         ------ ----
-a----        27.5.2012      1:00          55808 pthreadVC2.dll
- Copy OpenSSL libraries ‘‘libeay32.dll’’ and ‘‘ssleay32.dll’’ to Mosquitto install folder
PS C:\> dir "C:\Program Files (x86)\OpenSSL-Win32-102j\*eay32.dll"


    Directory: C:\Program Files (x86)\OpenSSL-Win32-102j


Mode                LastWriteTime         Length Name
----                -------------         ------ ----
-a----        26.9.2016     10:00        1265664 libeay32.dll
-a----        26.9.2016     10:00         274432 ssleay32.dll

PS C:\> copy "C:\Program Files (x86)\OpenSSL-Win32-102j\*eay32.dll" "C:\Program Files (x86)\mosquitto\"
PS C:\> dir "C:\Program Files (x86)\mosquitto\*eay32.dll"


    Directory: C:\Program Files (x86)\mosquitto


Mode                LastWriteTime         Length Name
----                -------------         ------ ----
-a----        26.9.2016     10:00        1265664 libeay32.dll
-a----        26.9.2016     10:00         274432 ssleay32.dll
- If you need change Mosquitto configuration
PS C:\> notepad "C:\Program Files (x86)\mosquitto\mosquitto.conf"
- Start Mosquitto service
PS C:\> Set-Service Mosquitto -Status Running
PS C:\> Get-Service Mosquitto

Status   Name               DisplayName
------   ----               -----------
Running  mosquitto          Mosquitto Broker
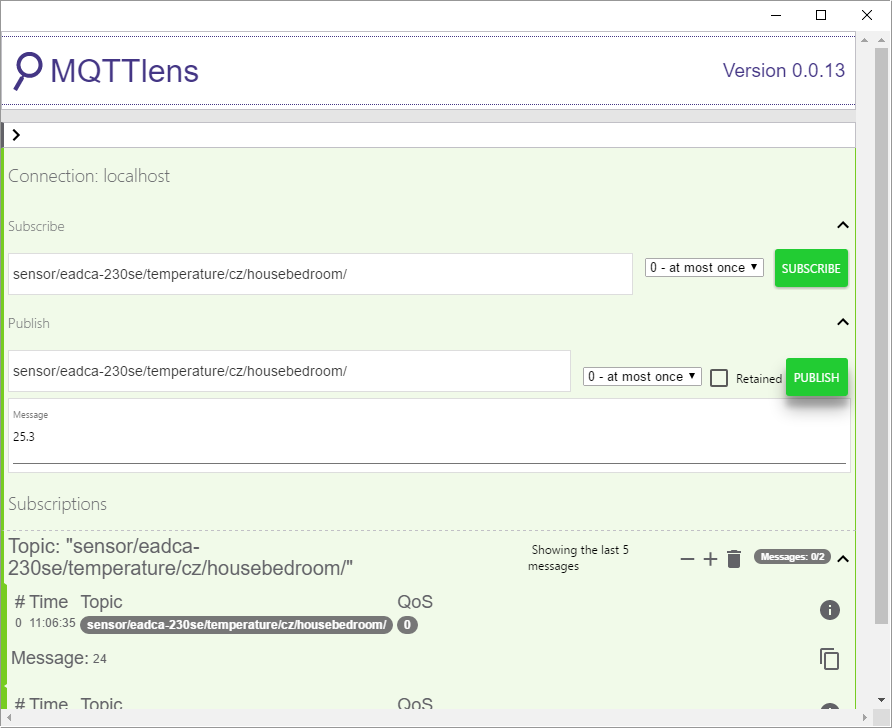
Testing MQTT protocol with MQTTLens
For testing of MTTQ Broker and data on MQTT protocal is used Chrome extensinon MQTTLens
NodeMCU HTTP Server
Deploy httpd to ESP8266
- Download ‘‘httpd.c’’ https://raw.githubusercontent.com/lichnak/nodemcu-labka/master/src/node_server_20170311/firmware/httpd.c
- Copy file ‘‘httpd.c’’ to folder ‘‘app/modules/’’
cp httpd.c ~/nodemcu-firmware/nodemcu-firmware-2.0.0-master_20170202/app/modules/
- Edit file ‘‘app/include/user_modules.h’’ and add one line to user modules.
mcedit ~/nodemcu-firmware/nodemcu-firmware-2.0.0-master_20170202/app/include/user_modules.h

#define LUA_USE_MODULES_HTTPD
- Compile firmware as was descibed https://labka.cz/wiki/doku.php?id=project:nodemcu_lbe:en or download compiled bootloader https://github.com/lichnak/nodemcu-labka/raw/master/src/node_server_20170311/firmware/0x00000.bin and firmware https://github.com/lichnak/nodemcu-labka/raw/master/src/node_server_20170311/firmware/0x10000.bin
- Connect nodeMCU to USB
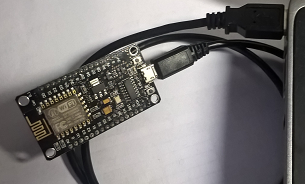
- Upload bootloader //bin/0x00000.bin// and firmware //bin/0x10000.bin// to ESP8266 as was descibed for Windows 10 https://labka.cz/wiki/doku.php?id=project:nodemcu_windev:enand for Ubuntu https://labka.cz/wiki/doku.php?id=project:nodemcu_ubudev:en

- Open ESPlorer and connect to nodeMCU
Formatting file system. Please wait...
Waiting answer from ESP - Timeout reached. Command aborted.
Formatting file system. Please wait...

NodeMCU 2.0.0 build unspecified powered by Lua 5.1.4 on SDK 2.0.0(656edbf)
lua: cannot open init.lua
>
- Upload httpd files from https://github.com/lichnak/nodemcu-labka/tree/master/src/node_server_20170311 to ESP8266
> Uploading to ESP file about.tmpl...Success
> Uploading to ESP file api.tmpl...Success
> Uploading to ESP file assemble.lua...Success
> Uploading to ESP file console.tmpl...Success
> Uploading to ESP file edit.tmpl...Success
> Uploading to ESP file ext_httpd.lua...Success
> Uploading to ESP file ext_wifi.lua...Success
> Uploading to ESP file ext_wifi_settings.lua...Success
> Uploading to ESP file favicon.ico...Success
> Uploading to ESP file gpio.tmpl...Success
> Uploading to ESP file gpio_set.tmpl...Success
> Uploading to ESP file httpd.lua...Success
> Uploading to ESP file index.tmpl...Success
> Uploading to ESP file init.lua...Success
> Uploading to ESP file page.tmpl...Success
> Uploading to ESP file static__console.js...Success
> Uploading to ESP file static__favicon.ico...Success
> Uploading to ESP file static__node.css...Success
> Uploading to ESP file static__node.js...Success
> Uploading to ESP file static__svg.js...Success
> Uploading to ESP file wifi.tmpl...Success
- Configure script ‘‘ext_wifi_settings.lua’’ for WiFi connection strings
> file.open("ext_wifi_settings.lua","w+");
> w = file.writeline
> w([==[wifiSSID="YOUR_WIFI_SSID"]==]);
> w([==[wifiPassword="YOUR_WIFI_PASSPHRASE"]==]);
> file.close();
- On ESP8266 execute script ‘‘assemble.lua’’
> dofile("assemble.lua")
remove: static/console.js
rename: static__console.js -> static/console.js
remove: static/node.css
rename: static__node.css -> static/node.css
remove: static/node.js
rename: static__node.js -> static/node.js
remove: static/svg.js
rename: static__svg.js -> static/svg.js
remove: static/favicon.ico
rename: static__favicon.ico -> static/favicon.ico
load content file: index.tmpl
build: static/index.htm
load content file: api.tmpl
build: static/api.htm
load content file: gpio.tmpl
build: static/gpio.htm
load content file: wifi.tmpl
build: static/wifi.htm
load content file: console.tmpl
build: static/console.htm
load content file: edit.tmpl
build: static/edit.htm
- Restart nodeMCU with ‘‘RST’’ button
- Wait for nodeMCU start up
NodeMCU 2.0.0 build unspecified powered by Lua 5.1.4 on SDK 2.0.0(656edbf)

WIFI initialization - mode(STATION)

STATION
WIFI - Connecting to SSID (YOUR_WIFI_SSID)...
Starting Web Server - port:  80
> IP Info:
IP Address:  YOUR-NODEMCU-IP-ADDRESS
Netmask:  YOUR-NETWORK-MASK
Gateway Addr:  YOUR-NETWORK-GATEWAY
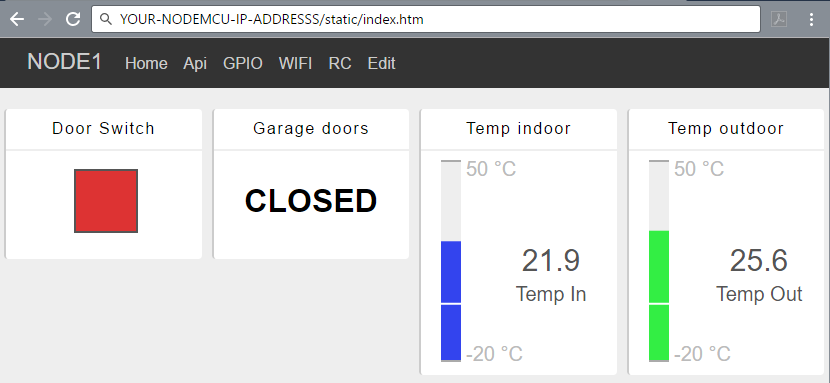
- Open ‘‘YOUR-NODEMCU-IP-ADDRESS’’ in Web browser
