RPi Hadoop Cluster
Trocha teorie
https://hadoop.apache.org/docs/r2.7.4/hadoop-project-dist/hadoop-hdfs/HdfsDesign.html
https://labka.cz/wiki/doku.php?id=project:rpihadoop
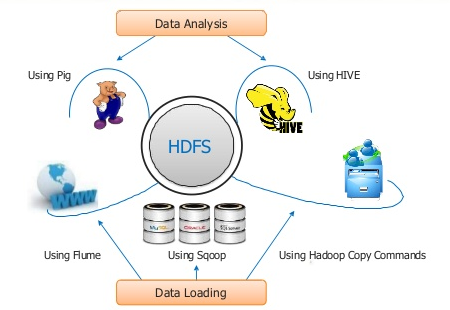
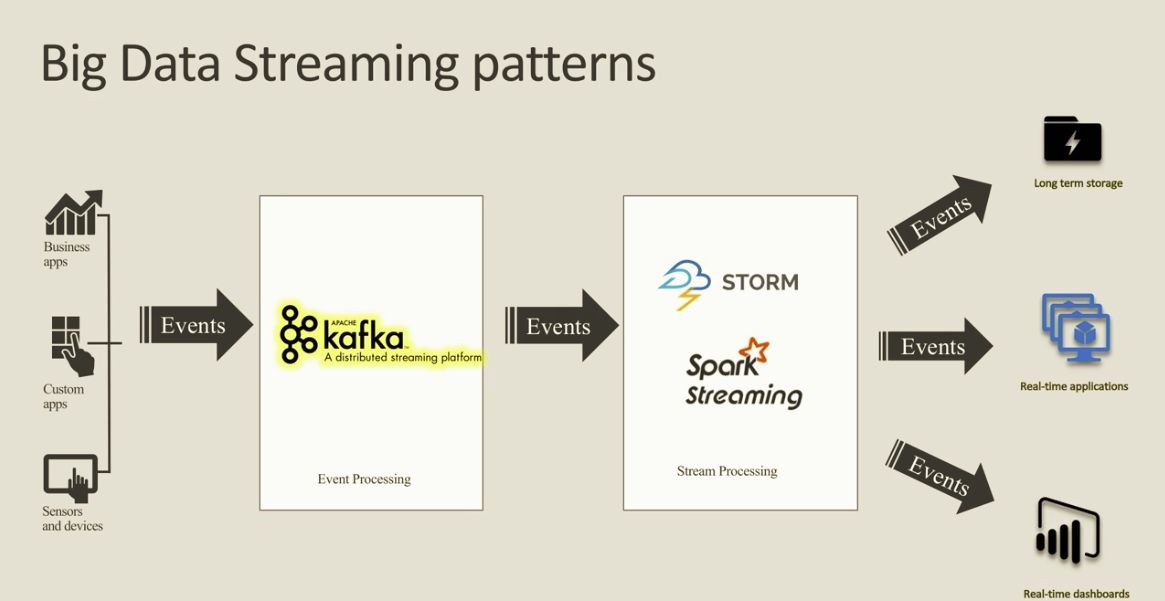
Zpracovani Dat
- Data Loading
- Data Analysis
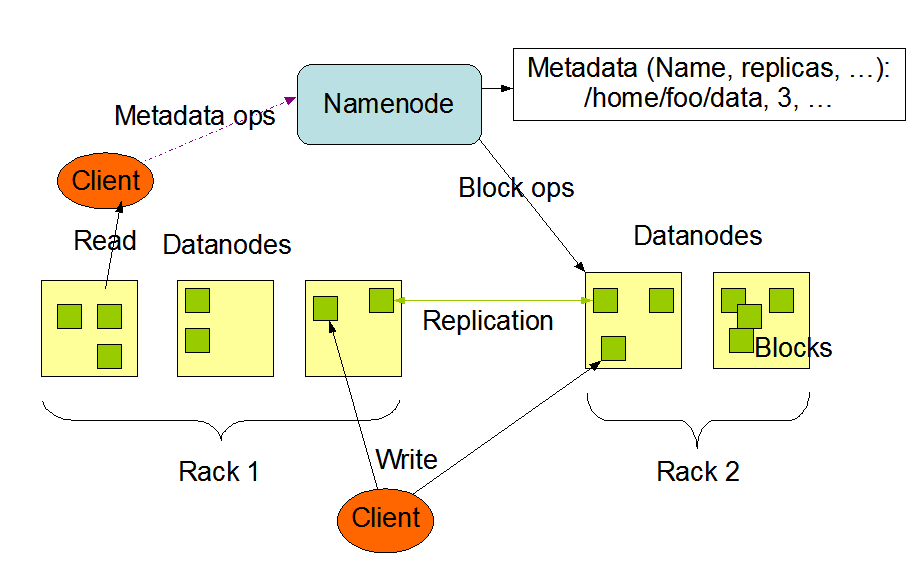
- HDFS
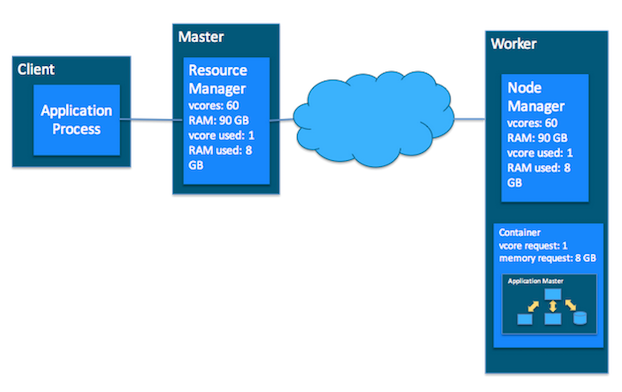
- Yarn
- MapReduce
- MapReduce a Yarn
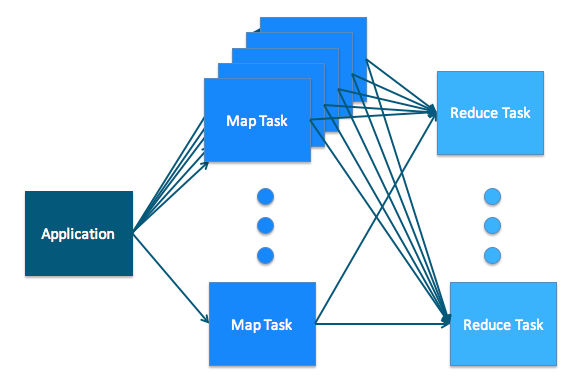
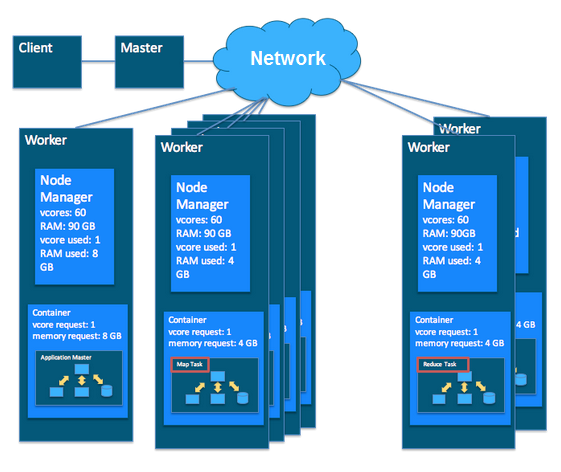
Implementace
Krok 1: Hardware
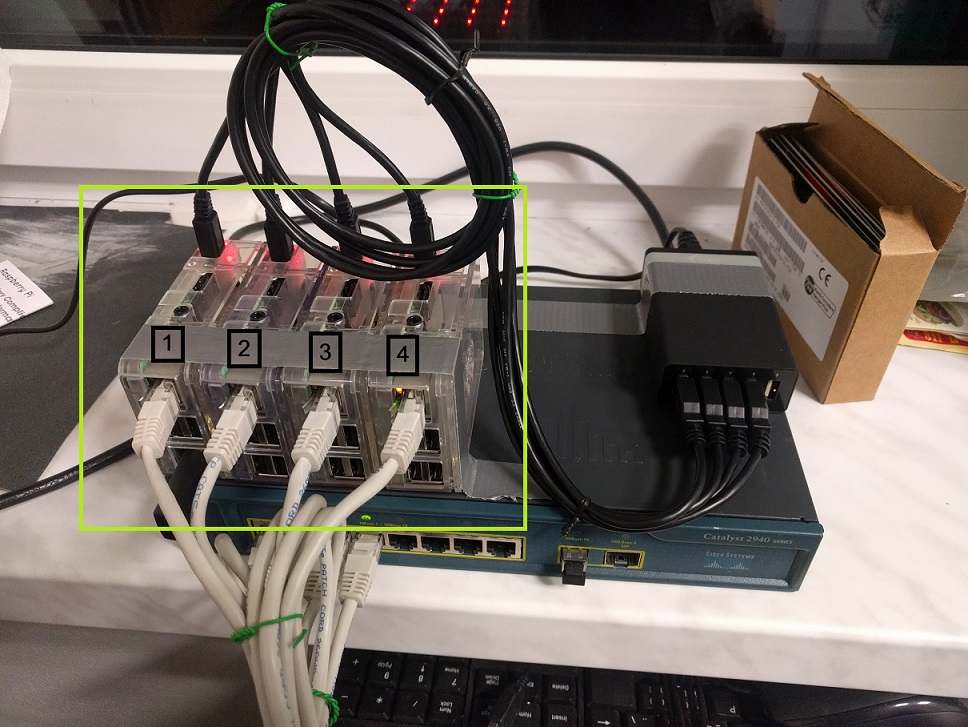
Včera 12.9. jsme rozjeli stavbu Spark a Hadoop klusteru a nize na obrazku si muzete zatim prohlednout fyzickou topologii klusteru. Dron se postaral o “za-rackovani”. Pristi tyden dojedem konfiguraci.
- RPi3 Cislo 1: hadoop-rpi1 - 192.168.1.149
- RPi3 Cislo 2: hadoop-rpi2 - 192.168.1.148
- RPi3 Cislo 3: hadoop-rpi3 - 192.168.1.144
- RPi3 Cislo 4: hadoop-rpi4 - 192.168.1.145
Krok 2: Hadoop SingleNode
18.9. jsme s PBem doinstalovali a nakonfigurovali RPi3 cislo 4 do stavu HDFS SingleNode. PB zacal reimagovat zbyle SD karty pro RPi3 cisla 1-3.
Instalace Hadoop a Spark SingleNode
Konfiguracni soubor ke stazeni https://lichnak.cz/assets/Hadoop-Rpi-Instalace.7z
-
Konfigurace ‘‘/etc/hosts’’:
cat <<EOF>/etc/hosts 172.16.20.11 hadoop-rpi1.labka.cz hadoop-rpi1 172.16.20.12 hadoop-rpi2.labka.cz hadoop-rpi2 172.16.20.13 hadoop-rpi3.labka.cz hadoop-rpi3 172.16.20.14 hadoop-rpi4.labka.cz hadoop-rpi4 127.0.0.1 localhost ::1 localhost ip6-localhost ip6-loopback ff02::1 ip6-allnodes ff02::2 ip6-allrouters 127.0.1.1 hadoop-rpi4.labka.cz hadoop-rpi4 EOF -
Konfigurace ‘‘/etc/network/interfaces’’:
cp /etc/network/interfaces{,.bak}
rm -f /etc/network/interfaces
cat <<EOF>/etc/network/interfaces
source-directory /etc/network/interfaces.d
source /etc/network/interfaces.d/*
EOF
- Konfigurace ‘‘eth0’’:
cat >/etc/network/interfaces.d/eth0 <<EOF
auto eth0
iface eth0 inet dhcp
EOF
- Update, instalace a konfigurace nastroju:
apt-get update
apt-get upgrade
apt-get install zip unzip ntp lsof tcpdump rsync sysstat wget ansible dnsutils --fix-missing
- Vytvoreni admin uctu:
adduser aiadmin
adduser aiadmin sudo
sudo cat <<EOF> /etc/sudoers.d/010_aiadmin-nopasswd
aiadmin ALL = (ALL) NOPASSWD: ALL
EOF
- Vytvoreni klicu pro hadoop admina:
su aiadmin
mkdir .ssh
cd .ssh
touch authorized_keys
chmod 700 ~/.ssh/
chmod 600 ~/.ssh/authorized_keys
ssh-keygen -b 2048 -t rsa -P ''  -f ~/.ssh/id_rsa
ssh-agent $SHELL
ssh-add -l
ssh-add
exit
ssh-copy-id -i ~/.ssh/id_rsa.pub hadoop-rpi3
- Vytvoreni hadoop uctu:
addgroup hadoop
adduser --ingroup hadoop hduser
adduser hduser sudo
cat <<EOF> /etc/sudoers.d/020_hduser-nopasswd
hduser ALL=(ALL) NOPASSWD: ALL
EOF
- Vytvoreni klicu pro hduser:
su hduser
mkdir .ssh
cd .ssh
touch authorized_keys
chmod 700 ~/.ssh/
chmod 600 ~/.ssh/authorized_keys
ssh-keygen -b 4096 -t rsa -P ''  -f ~/.ssh/id_rsa
ssh-agent $SHELL
ssh-add -l
ssh-add
exit
- Pridani klicu na remote-hosts:
ssh-copy-id -i ~/.ssh/id_rsa.pub hadoop-rpi1
ssh-copy-id -i ~/.ssh/id_rsa.pub hadoop-rpi2
ssh-copy-id -i ~/.ssh/id_rsa.pub hadoop-rpi3
ssh-copy-id -i ~/.ssh/id_rsa.pub hadoop-rpi4
- Overeni ssh spojeni:
ssh hadoop-rpi1.labka.cz
ssh hadoop-rpi2.labka.cz
ssh hadoop-rpi3.labka.cz
ssh hadoop-rpi4.labka.cz
- Smazani vychoziho ‘‘pi’’ uzivatele:
userdel pi
rm -f /etc/sudoers.d/010_pi-nopasswd
rm -rf /home/pi
- Konfigurace ntpd:
cat <<EOF> /etc/ntp.conf
driftfile /var/lib/ntp/ntp.drift
statsdir /var/log/ntpstats/
statistics loopstats peerstats clockstats
filegen loopstats file loopstats type day enable
filegen peerstats file peerstats type day enable
filegen clockstats file clockstats type day enable
server ntp.nic.cz iburst prefer
server tik.cesnet.cz iburst
server tak.cesnet.cz iburst
pool 0.debian.pool.ntp.org iburst
pool 1.debian.pool.ntp.org iburst
pool 2.debian.pool.ntp.org iburst
pool 3.debian.pool.ntp.org iburst
restrict -4 default kod notrap nomodify nopeer noquery limited
restrict -6 default kod notrap nomodify nopeer noquery limited
restrict 127.0.0.1
restrict ::1
restrict source notrap nomodify noquery
EOF
- Overeni konfigurace:
cat /etc/hosts
cat /etc/resolv.conf
ls -la /etc/sudoers.d/
- Konfigurace SingleNode ‘‘/opt/hadoop-2.7.4/etc/hadoop/slaves’’:
cp /opt/hadoop-2.7.4/etc/hadoop/slaves{,.bak}
cat <<EOF>/opt/hadoop-2.7.4/etc/hadoop/slaves
hadoop-rpi1.labka.cz
EOF
- Konfigurace ClusterNode ‘‘/opt/hadoop-2.7.4/etc/hadoop/masters’’:
cat <<EOF>/opt/hadoop-2.7.4/etc/hadoop/masters
hadoop-rpi1.labka.cz
EOF```

- Konfigurace ClusterNode ''/opt/hadoop-2.7.4/etc/hadoop/slaves'':

```bash
cp /opt/hadoop-2.7.4/etc/hadoop/slaves{,.bak}
cat <<EOF>/opt/hadoop-2.7.4/etc/hadoop/slaves
hadoop-rpi1.labka.cz
hadoop-rpi2.labka.cz
hadoop-rpi3.labka.cz
hadoop-rpi4.labka.cz
EOF
- Overeni hadoop konfigurace:
ls -la /opt/hadoop-2.7.4/etc/hadoop
cat /opt/hadoop-2.7.4/etc/hadoop/masters
cat /opt/hadoop-2.7.4/etc/hadoop/slaves
- Konfigurace ‘‘/opt/hadoop-2.7.4/etc/hadoop/mapred-site.xml’’:
cat <<EOT>/opt/hadoop-2.7.4/etc/hadoop/mapred-site.xml
<configuration>
    <property>
        <name>mapreduce.job.tracker</name>
        <value>hadoop-rpi1.labka.cz:5431</value>
    </property>
    <property>
        <name>mapreduce.framework.name</name>
        <value>yarn</value>
    </property>
    <property>
        <name>mapreduce.map.memory.mb</name>
        <value>256</value>
    </property>
    <property>
        <name>mapreduce.map.java.opts</name>
        <value>-Xmx204m</value>
    </property>
    <property>
        <name>mapreduce.reduce.memory.mb</name>
        <value>102</value>
    </property>
    <property>
        <name>mapreduce.reduce.java.opts</name>
        <value>-Xmx102m</value>
    </property>
    <property>
        <name>yarn.app.mapreduce.am.resource.mb</name>
        <value>128</value>
    </property>
    <property>
        <name>yarn.app.mapreduce.am.command-opts</name>
        <value>-Xmx102m</value>
    </property>
</configuration>
EOT
- Konfigurace ‘‘/opt/hadoop-2.7.4/etc/hadoop/hdfs-site.xml’’:
cat <<EOT>/opt/hadoop-2.7.4/etc/hadoop/hdfs-site.xml
<configuration>
    <property>
        <name>dfs.datanode.data.dir</name>
        <value>/opt/hadoop_tmp/hdfs/datanode</value>
        <final>true</final>
    </property>
    <property>
        <name>dfs.namenode.name.dir</name>
        <value>/opt/hadoop_tmp/hdfs/namenode</value>
        <final>true</final>
    </property>
    <property>
        <name>dfs.namenode.http-address</name>
        <value>master:50070</value>
    </property>
    <property>
        <name>dfs.replication</name>
        <value>11</value>
    </property>
</configuration>
EOT
- Konfigurace ‘‘/opt/hadoop-2.7.4/etc/hadoop/core-site.xml’’:
cat <<EOT>/opt/hadoop-2.7.4/etc/hadoop/core-site.xml
<configuration>
    <property>
        <name>fs.default.name</name>
        <value>hdfs://hadoop-rpi1.labka.cz:9000/</value>
    </property>
    <property>
        <name>fs.default.FS</name>
        <value>hdfs://hadoop-rpi1.labka.cz:9000/</value>
    </property>
    <property>
        <name>hadoop.tmp.dir</name>
        <value>/opt/hadoop_tmp/hdfs/tmp</value>
    </property>
</configuration>
EOF
- Konfigurace ‘‘/opt/hadoop-2.7.4/etc/hadoop/yarn-site.xml’’:
cat <<EOF>/opt/hadoop-2.7.4/etc/hadoop/yarn-site.xml
<configuration>
    <property>
        <name>yarn.resourcemanager.resource-tracker.address</name>
        <value>master:8025</value>
    </property>
    <property>
        <name>yarn.resourcemanager.scheduler.address</name>
        <value>master:8035</value>
    </property>
    <property>
        <name>yarn.resourcemanager.address</name>
        <value>master:8050</value>
    </property>
   <property>
     <name>yarn.nodemanager.aux-services</name>
     <value>mapreduce_shuffle</value>
   </property>
   <property>
     <name>yarn.nodemanager.resource.cpu-vcores</name>
     <value>4</value>
   </property>
   <property>
     <name>yarn.nodemanager.resource.memory-mb</name>
     <value>1024</value>
   </property>
   <property>
     <name>yarn.scheduler.minimum-allocation-mb</name>
     <value>128</value>
   </property>
   <property>
     <name>yarn.scheduler.maximum-allocation-mb</name>
     <value>1024</value>
   </property>
   <property>
     <name>yarn.scheduler.minimum-allocation-vcores</name>
     <value>1</value>
   </property>
   <property>
     <name>yarn.scheduler.maximum-allocation-vcores</name>
     <value>4</value>
   </property>
   <property>
     <name>yarn.nodemanager.vmem-check-enabled</name>
     <value>false</value>
   </property>
   <property>
      <name>yarn.nodemanager.pmem-check-enabled</name>
      <value>true</value>
   </property>
   <property>
     <name>yarn.nodemanager.vmem-pmem-ratio</name>
     <value>4</value>
   </property>
   <property>
     <name>yarn.nodemanager.disk-health-checker.max-disk-utilization-per-disk-percentage</name>
     <value>98.5</value>
   </property>
</configuration>
EOF
- Konfigurace ‘‘spark-env.sh’’ podle ‘‘$SPARK_HOME/conf/spark-env.sh.template’’:
cp /opt/spark-2.1.0-bin-hadoop2.7/conf/spark-env.sh{,.bak}
cat <<EOF>/opt/spark-2.1.0-bin-hadoop2.7/conf/spark-env.sh
#!/usr/bin/env bash
SPARK_MASTER_HOST=hadoop-rpi1.labka.cz
SPARK_WORKER_MEMORY=512m
EOT
- Konfigurace ‘‘/opt/hadoop-2.7.4/etc/hadoop/hadoop-env.sh’’:
cat <<EOF>/opt/hadoop-2.7.4/etc/hadoop/hadoop-env.sh
#!/usr/bin/env bash
# Set Hadoop-specific environment variables here.
#export JAVA_HOME=${JAVA_HOME}
export JAVA_HOME=/usr/lib/jvm/java-8-openjdk-armhf/jre
export HADOOP_CONF_DIR=${HADOOP_CONF_DIR:-"/opt/hadoop-2.7.4/etc/hadoop"}

# Extra Java CLASSPATH elements.  Automatically insert capacity-scheduler.
for f in $HADOOP_HOME/contrib/capacity-scheduler/*.jar; do
  if [ "$HADOOP_CLASSPATH" ]; then
    export HADOOP_CLASSPATH=$HADOOP_CLASSPATH:$f
  else
    export HADOOP_CLASSPATH=$f
  fi
done

# The maximum amount of heap to use, in MB. Default is 1000.
#export HADOOP_HEAPSIZE=
#export HADOOP_NAMENODE_INIT_HEAPSIZE=""

# Extra Java runtime options.  Empty by default.
export HADOOP_OPTS="$HADOOP_OPTS -Djava.net.preferIPv4Stack=true"

# Command specific options appended to HADOOP_OPTS when specified
export HADOOP_NAMENODE_OPTS="-Dhadoop.security.logger=${HADOOP_SECURITY_LOGGER:-INFO,RFAS} -Dhdfs.audit.logger=${HDFS_AUDIT_LOGGER:-INFO,NullAppender} $HADOOP_NAMENODE_OPTS"
export HADOOP_DATANODE_OPTS="-Dhadoop.security.logger=ERROR,RFAS $HADOOP_DATANODE_OPTS"

export HADOOP_SECONDARYNAMENODE_OPTS="-Dhadoop.security.logger=${HADOOP_SECURITY_LOGGER:-INFO,RFAS} -Dhdfs.audit.logger=${HDFS_AUDIT_LOGGER:-INFO,NullAppender} $HADOOP_SECONDARYNAMENODE_OPTS"

export HADOOP_NFS3_OPTS="$HADOOP_NFS3_OPTS"
export HADOOP_PORTMAP_OPTS="-Xmx512m $HADOOP_PORTMAP_OPTS"

# The following applies to multiple commands (fs, dfs, fsck, distcp etc)
export HADOOP_CLIENT_OPTS="-Xmx512m $HADOOP_CLIENT_OPTS"
#HADOOP_JAVA_PLATFORM_OPTS="-XX:-UsePerfData $HADOOP_JAVA_PLATFORM_OPTS"

# On secure datanodes, user to run the datanode as after dropping privileges.
# This **MUST** be uncommented to enable secure HDFS if using privileged ports
# to provide authentication of data transfer protocol.  This **MUST NOT** be
# defined if SASL is configured for authentication of data transfer protocol
# using non-privileged ports.
export HADOOP_SECURE_DN_USER=${HADOOP_SECURE_DN_USER}

# Where log files are stored.  $HADOOP_HOME/logs by default.
#export HADOOP_LOG_DIR=${HADOOP_LOG_DIR}/$USER

# Where log files are stored in the secure data environment.
export HADOOP_SECURE_DN_LOG_DIR=${HADOOP_LOG_DIR}/${HADOOP_HDFS_USER}

# HDFS Mover specific parameters
# Specify the JVM options to be used when starting the HDFS Mover.
# These options will be appended to the options specified as HADOOP_OPTS
# and therefore may override any similar flags set in HADOOP_OPTS
# export HADOOP_MOVER_OPTS=""
export HADOOP_PID_DIR=${HADOOP_PID_DIR}
export HADOOP_SECURE_DN_PID_DIR=${HADOOP_PID_DIR}

export HADOOP_IDENT_STRING=$USER
EOF
- Pridani promenych do ‘‘/home/hduser/.bashrc’’:
cat <<EOF>>/home/hduser/.bashrc
export JAVA_HOME=/usr/lib/jvm/java-8-openjdk-armhf/jre
export HADOOP_HOME=/opt/hadoop-2.7.4
export HADOOP_PREFIX=$HADOOP_HOME
export HADOOP_MAPRED_HOME=$HADOOP_HOME
export HADOOP_COMMON_HOME=$HADOOP_HOME
export HADOOP_HDFS_HOME=$HADOOP_HOME
export HADOOP_YARN_HOME=$HADOOP_HOME
export HADOOP_COMMON_LIB_NATIVE_DIR=$HADOOP_HOME/lib/native
export HADOOP_CONF_DIR=$HADOOP_HOME/etc/hadoop
export HADOOP_YARN_CONF_DIR=$HADOOP_HOME/etc/hadoop
export YARN_HOME=$HADOOP_HOME
export YARN_CONF_DIR=$HADOOP_HOME/etc/hadoop
export HADOOP_SPARK_HOME=/opt/spark-2.1.0-bin-hadoop2.7
export SPARK_HOME=/opt/spark-2.1.0-bin-hadoop2.7
export PATH=$PATH:$HADOOP_HOME/bin:$HADOOP_HOME/sbin
export PATH=$PATH:$SPARK_HOME/bin
EOF

source /home/hduser/.bashrc
- Osetrime vlastnictvi slozek:
chown -R hduser:hadoop /home/hduser/
chown -R hduser:hadoop /opt/hadoop-2.7.4/
chown -R hduser:hadoop /opt/spark-2.1.0-bin-hadoop2.7
- Konfigurace uloziste ‘‘/hdfs’’:
#Zopakujem na vsech nodech
mkdir -p /opt/hadoop_tmp/hdfs/tmp
mkdir -p /opt/hadoop_tmp/hdfs/namenode
mkdir -p /opt/hadoop_tmp/hdfs/datanode
chown -R hduser:hadoop /opt/hadoop_tmp
chmod -R 750 /opt/hadoop_tmp
- Spusteni ‘‘hdfs’’ z master nodu:
```bash/opt/hadoop-2.7.4/bin/hdfs namenode -format /opt/hadoop-2.7.4/sbin/start-dfs.sh curl http://hadoop-rpi1.labka.cz:50070/ /opt/hadoop-2.7.4/sbin/start-yarn.sh curl http://hadoop-rpi1.labka.cz:8088/
- Vytvorit slozky:

```bash
/opt/hadoop-2.7.4/bin/hdfs dfs -mkdir /user
/opt/hadoop-2.7.4/bin/hdfs dfs -mkdir /user/hduser
/opt/hadoop-2.7.4/bin/hdfs dfs -mkdir /user/hduser/input
/opt/hadoop-2.7.4/bin/hdfs dfs -mkdir /user/hduser/pcaps
/opt/hadoop-2.7.4/bin/hdfs dfs -put /opt/hadoop-2.7.4/etc/hadoop /user/hduser/input
- Integrace s LDAP:
sudo apt-get install libpam-ldapd libnss-ldapd

# sudo vi /etc/pam.d/common-session

sudo cat <<EOF>/etc/pam.d/common-session

#

# /etc/pam.d/common-session - session-related modules common to all services

#

# This file is included from other service-specific PAM config files

# and should contain a list of modules that define tasks to be performed

# at the start and end of sessions of *any* kind (both interactive and

# non-interactive)

#

# As of pam 1.0.1-6, this file is managed by pam-auth-update by default

# To take advantage of this, it is recommended that you configure any

# local modules either before or after the default block, and use

# pam-auth-update to manage selection of other modules.  See

# pam-auth-update(8) for details

# here are the per-package modules (the "Primary" block)

session [default=1]                     pam_permit.so

# here's the fallback if no module succeeds

session requisite                       pam_deny.so

# prime the stack with a positive return value if there isn't one already

# this avoids us returning an error just because nothing sets a success code

# since the modules above will each just jump around

session required                        pam_permit.so
session required pam_mkhomedir.so umask=027 skel=/etc/skel

# and here are more per-package modules (the "Additional" block)

session required        pam_unix.so
session [success=ok default=ignore]     pam_ldap.so minimum_uid=1000
session optional        pam_systemd.so
session optional        pam_chksshpwd.so

# end of pam-auth-update config

EOF
Krok 3: Hardware
- Prilepit switch Cisco 2960 do interni VLANy.
-
Embargo prislibil rezevaci IP adres na dhcp. [[internal:labkanet Labka site - Vypnout Wifi moduly:
sudo vi /boot/config.txt

# Additional overlays and parameters are documented /boot/overlays/README
dtoverlay=pi3-disable-wifi
- Restartovat RPicky:
sudo shutdown -r now
Krok 4: Hadoop ClusterNode
Doimagovat RPi3 cisla 1-3 a pridat je do Hadoop klusteru.
Management UI
- http://hadoop-rpi1.labka.cz:8088/
- http://hadoop-rpi1.labka.cz:50070/
- http://hadoop-rpi1.labka.cz:50080/
Hadoop kluster
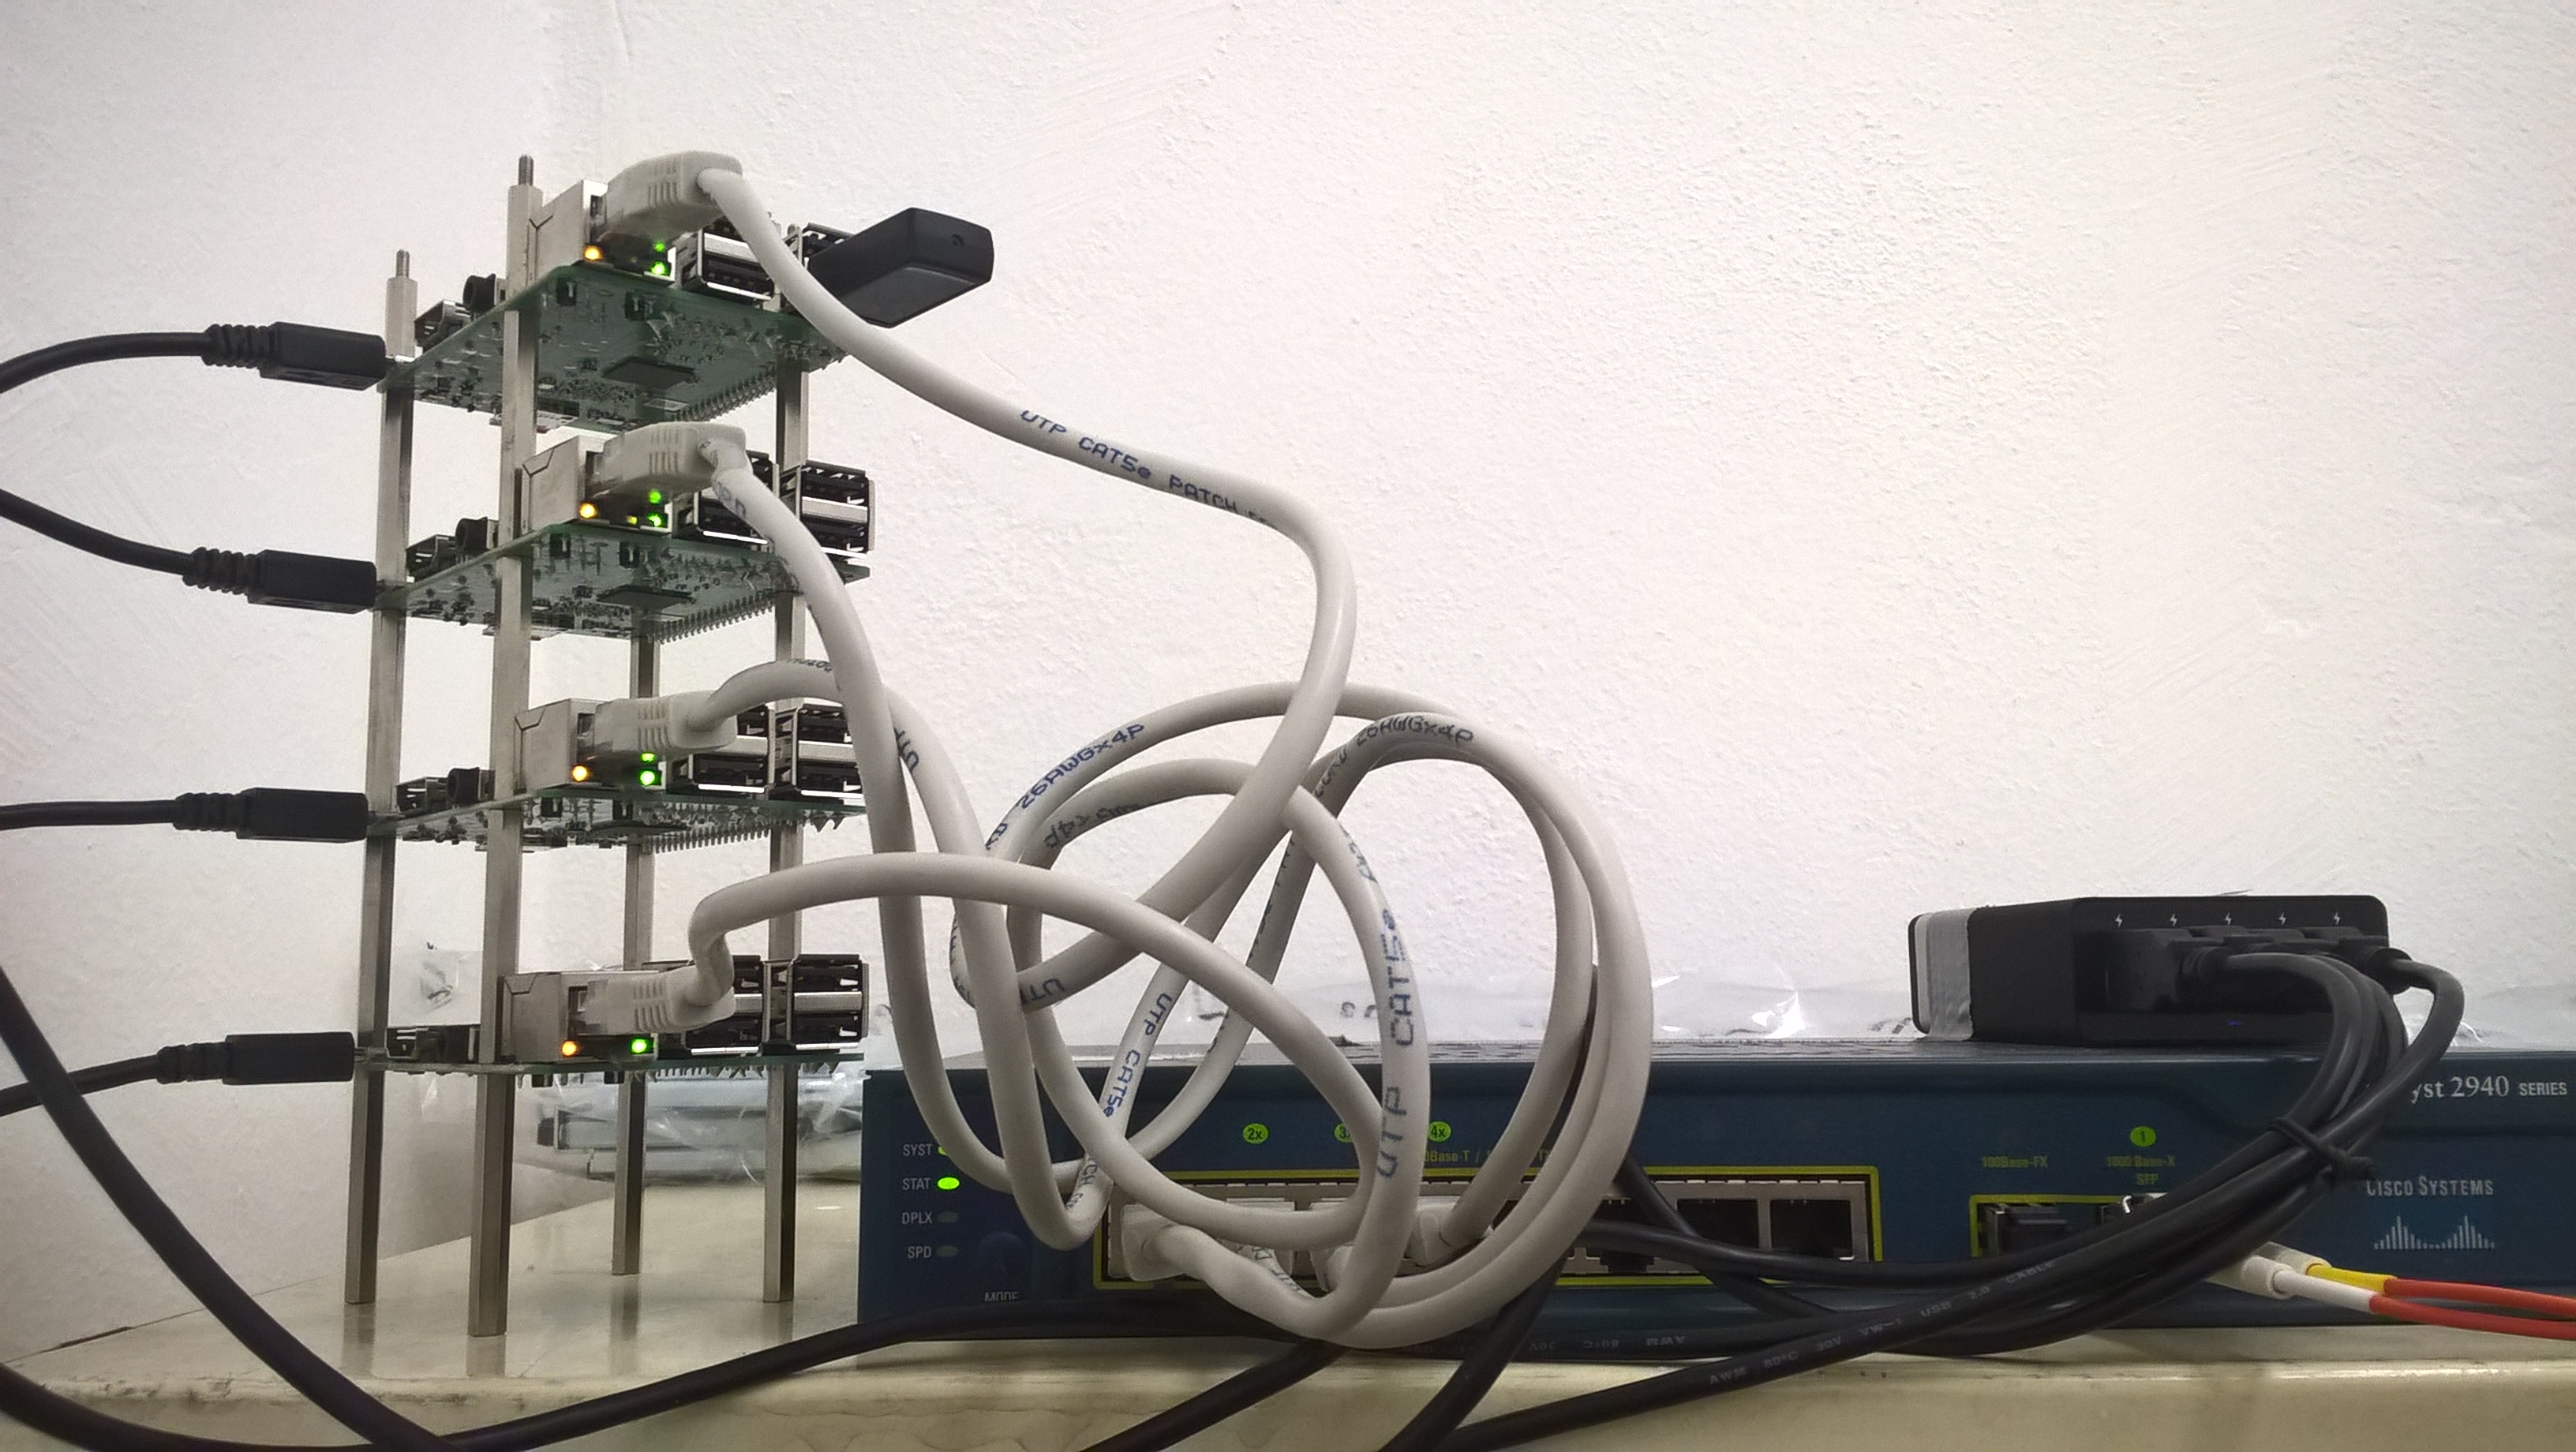
Hura od 29.10.2017 mame plne funkci Hadoop kluster!!!
- Spuštění Klusteru:
[hdfs]sudo rm -rf /hdfs/
[hdfs]sudo mkdir -p /hdfs/tmp
[hdfs]sudo mkdir -p /hdfs/namenode
[hdfs]sudo mkdir -p /hdfs/datanode
[hdfs]sudo chown -R hduser:hadoop /hdfs/
[hdfs]sudo chmod 750 -R /hdfs/
[hdfs]source /home/hduser/.bashrc
[hdfs]$HADOOP_PREFIX/bin/hdfs namenode -format hadoop-rpi
[hdfs]$HADOOP_PREFIX/sbin/hadoop-daemon.sh --config $HADOOP_CONF_DIR --script hdfs start namenode
[hdfs]$HADOOP_PREFIX/sbin/hadoop-daemons.sh --config $HADOOP_CONF_DIR --script hdfs start datanode
[hdfs]$HADOOP_PREFIX/sbin/start-dfs.sh
[yarn]$HADOOP_YARN_HOME/sbin/yarn-daemon.sh --config $HADOOP_CONF_DIR start resourcemanager
[yarn]$HADOOP_YARN_HOME/sbin/yarn-daemons.sh --config $HADOOP_CONF_DIR start nodemanager
[yarn]$HADOOP_YARN_HOME/sbin/yarn-daemon.sh --config $HADOOP_CONF_DIR start proxyserver
[yarn]$HADOOP_PREFIX/sbin/start-yarn.sh
[mapred]$HADOOP_PREFIX/sbin/mr-jobhistory-daemon.sh --config $HADOOP_CONF_DIR start historyserver
- Ověření běhu Klusteru:
#Kontrola spustenych roli
jps

hduser@hadoop-rpi1:~ jps
1427 SecondaryNameNode
1189 NameNode
1850 Jps
1814 NodeManager
1710 ResourceManager
hduser@hadoop-rpi2:~ jps
1068 NodeManager
973 DataNode
1205 Jps
hduser@hadoop-rpi3:~ jps
1053 DataNode
1294 Jps
1157 NodeManager
hduser@hadoop-rpi4:~ jps
975 DataNode
1070 NodeManager
1207 Jps
- Testovací job:
# Test hadoop verze

/opt/hadoop-2.7.4/bin/hdfs dfs -mkdir /user
/opt/hadoop-2.7.4/bin/hdfs dfs -mkdir /user/hduser
/opt/hadoop-2.7.4/bin/hdfs dfs -mkdir /user/hduser/pcaps
/opt/hadoop-2.7.4/bin/hdfs dfs -mkdir /user/hduser/input
/opt/hadoop-2.7.4/bin/hadoop jar /opt/hadoop-2.7.4/share/hadoop/mapreduce/hadoop-mapreduce-examples-2.7.4.jar
/opt/hadoop-2.7.4/bin/hdfs dfs -put /opt/hadoop-2.7.4/etc/hadoop/*.xml /user/hduser/input
/opt/hadoop-2.7.4/bin/hdfs dfs -ls /user/hduser/input
/opt/hadoop-2.7.4/bin/hadoop jar /opt/hadoop-2.7.4/share/hadoop/mapreduce/hadoop-mapreduce-examples-2.7.4.jar grep /user/hduser/input /user/hduser/output 'dfs[az.]+'
/opt/hadoop-2.7.4/bin/hdfs dfs -cat /user/hduser/output/*
/opt/hadoop-2.7.4/bin/hdfs dfs -rm -r /user/hduser/input
/opt/hadoop-2.7.4/bin/hdfs dfs -rm -r /user/hduser/output
/opt/hadoop-2.7.4/bin/hdfs dfs -get /user/hduser/output output
cat output/*

# Spustit spark Job

spark-submit –class com.learning.spark.SparkWordCount –master yarn –executor-memory 512m ~/word_count-0.0.1-SNAPSHOT.jar /ntallapa/word_count/text 2

# Spustit example mapreduce job

hadoop jar /opt/hadoop-2.7.4/share/hadoop/mapreduce/hadoop-mapreduce-examples-2.7.4.jar wordcount /ntallapa/word_count/text /ntallapa/word_count/output

# Vycistit

rm -r /hdfs/tmp/dfs/data/current
- Výsledek testovacího jobu:
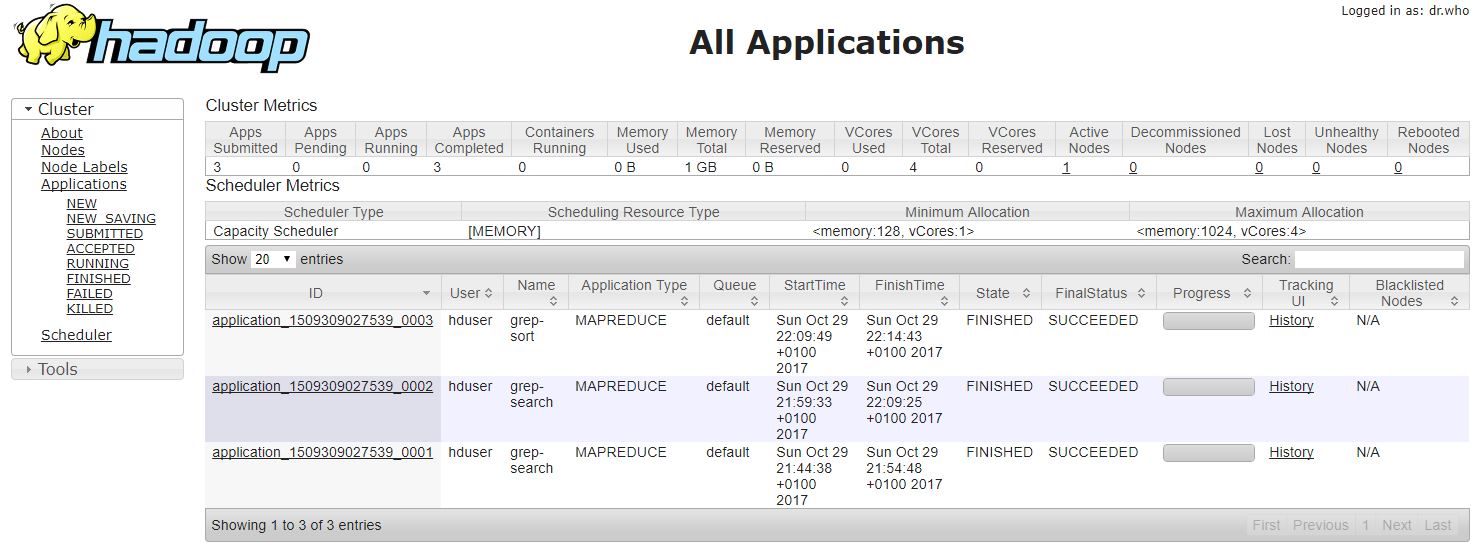 https://lichnak.cz/assets/hadoop-testovaci-log.7z
hduser@hadoop-rpi1:~ /opt/hadoop-2.7.4/bin/hdfs dfs -cat /user/hduser/output/*
17/10/29 21:30:16 WARN util.NativeCodeLoader: Unable to load native-hadoop library for your platform... using builtin-java classes where applicable
3       dfs.
1       dfsa
Krok 5: Hive
Instalace Maven
- Download Maven: Download the Binary tar.gz version the http://maven.apache.org/download.cgi website. Pick the latest version.
wget http://www.mirrorservice.org/sites/ftp.apache.org/maven/maven-3/3.2.5/binaries/apache-maven-3.2.5-bin.tar.gz
- Extract the archive to ‘‘/opt’’:
cd /opt
sudo tar -xzvf /path/to/apache-maven-3.2.5-bin.tar.gz
- Verify Maven installation path: Tell you shell where to find maven. We’ll do this in the system profile settings so it is available to all users.
sudoedit /etc/profile.d/maven.sh
and enter
export M2_HOME=/opt/apache-maven-3.2.5
export PATH=$PATH:$M2_HOME/bin
Quit and save from the editor.
- Running Maven:Log out and back into the Raspberry Pi so the profile script takes effect and there it is. You can test that it is working with
bash mvn -versionand you should see something like
Apache Maven 3.2.5 (12a6b3acb947671f09b81f49094c53f426d8cea1; 2014-12-14T17:29:23+00:00)
Maven home: /opt/apache-maven-3.2.5
Java version: 1.8.0, vendor: Oracle Corporation
Java home: /usr/lib/jvm/jdk-8-oracle-arm-vfp-hflt/jre
Default locale: en_GB, platform encoding: UTF-8
OS name: "linux", version: "3.12.26-rt40+", arch: "arm", family: "unix"
Instalace Apache Hive
-
Downloading Hive: We use hive-0.14.0 in this tutorial. You can download it by visiting the following link <http://apache.petsads.us/hive/hive-0.14.0/ http://apache.petsads.us/hive/hive-0.14.0/>. Let us assume it gets downloaded onto the /Downloads directory. Here, we download Hive archive named ‘‘apache-hive-0.14.0-bin.tar.gz’’ for this tutorial. The following command is used to verify the download:
cd Downloads
ls
On successful download, you get to see the following response:
apache-hive-0.14.0-bin.tar.gz
- Installing Hive: The following steps are required for installing Hive on your system. Let us assume the Hive archive is downloaded onto the /Downloads directory.
- Extracting and verifying Hive Archive: The following command is used to verify the download and extract the hive archive:
tar zxvf apache-hive-0.14.0-bin.tar.gz
ls
On successful download, you get to see the following response:
apache-hive-0.14.0-bin apache-hive-0.14.0-bin.tar.gz
- Copying files to /opt/apache-hive-0.14.0-bin directory: We need to copy the files from the super user ‘‘su -‘’. The following commands are used to copy the files from the extracted directory to the ‘‘/usr/local/hive’’ directory.
su -
passwd:

# cd /home/user/Download

# mv apache-hive-0.14.0-bin /usr/local/hive

# exit
- Setting up environment for Hive: You can set up the Hive environment by appending the following lines to ‘’~/.bashrc’’ file:
export HIVE_HOME=/usr/local/hive
export PATH=$PATH:$HIVE_HOME/bin
export CLASSPATH=$CLASSPATH:/usr/local/Hadoop/lib/*:.
export CLASSPATH=$CLASSPATH:/usr/local/hive/lib/*:.
```The following command is used to execute ''~/.bashrc'' file.```bash
source ~/.bashrc
- Configuring Hive: To configure Hive with Hadoop, you need to edit the ‘‘hive-env.sh’’* file, which is placed in the ‘‘$HIVE_HOME/conf’’ directory. The following commands redirect to Hive ‘‘config’’ folder and copy the template file:
cd $HIVE_HOME/conf
cp hive-env.sh.template hive-env.sh
Edit the ‘‘hive-env.sh’’ file by appending the following line:
export HADOOP_HOME=/usr/local/hadoop
Hive installation is completed successfully. Now you require an external database server to configure Metastore. We use Apache Derby database.
Instalace Apache derby
Follow the steps given below to download and install Apache Derby:
- Downloading Apache Derby: The following command is used to download Apache Derby. It takes some time to download.
cd ~
wget http://archive.apache.org/dist/db/derby/db-derby-10.4.2.0/db-derby-10.4.2.0-bin.tar.gz
The following command is used to verify the download:
ls
On successful download, you get to see the following response:
db-derby-10.4.2.0-bin.tar.gz
- Extracting and verifying Derby archive: The following commands are used for extracting and verifying the Derby archive:
tar zxvf db-derby-10.4.2.0-bin.tar.gz
ls
On successful download, you get to see the following response:
db-derby-10.4.2.0-bin db-derby-10.4.2.0-bin.tar.gz
- Copying files to /opt/db-derby-10.4.2.0-bin directory: We need to copy from the super user ‘‘su -‘’. The following commands are used to copy the files from the extracted directory to the ‘‘/opt/db-derby-10.4.2.0-bin’’ directory:
su -
passwd:
# cd /home/user
# mv db-derby-10.4.2.0-bin /usr/local/derby
# exit
- Setting up environment for Derby: You can set up the Derby environment by appending the following lines to ‘’~/.bashrc’’ file:
export DERBY_HOME=/usr/local/derby
export PATH=$PATH:$DERBY_HOME/bin
Apache Hive
18
export CLASSPATH=$CLASSPATH:$DERBY_HOME/lib/derby.jar:$DERBY_HOME/lib/derbytools.jar
The following command is used to execute~/.bashrc file:
source ~/.bashrc
Hive Metastore
- Create a directory to store Metastore: Create a directory named data in $DERBY_HOME directory to store Metastore data.
mkdir $DERBY_HOME/data
Derby installation and environmental setup is now complete.
- Configuring Metastore of Hive: Configuring Metastore means specifying to Hive where the database is stored. You can do this by editing the ‘‘hive-site.xml’’ file, which is in the ‘‘$HIVE_HOME/conf’’ directory. First of all, copy the template file using the following command:
cd $HIVE_HOME/conf
cp hive-default.xml.template hive-site.xml
Edit ‘‘hive-site.xml’’ and append the following lines between the ‘‘
<property>
   <name>javax.jdo.option.ConnectionURL</name>
   <value>jdbc:derby://localhost:1527/metastore_db;create=true </value>
   <description>JDBC connect string for a JDBC metastore </description>
</property>
Create a file named jpox.properties and add the following lines into it:
javax.jdo.PersistenceManagerFactoryClass =

org.jpox.PersistenceManagerFactoryImpl
org.jpox.autoCreateSchema = false
org.jpox.validateTables = false
org.jpox.validateColumns = false
org.jpox.validateConstraints = false
org.jpox.storeManagerType = rdbms
org.jpox.autoCreateSchema = true
org.jpox.autoStartMechanismMode = checked
org.jpox.transactionIsolation = read_committed
javax.jdo.option.DetachAllOnCommit = true
javax.jdo.option.NontransactionalRead = true
javax.jdo.option.ConnectionDriverName = org.apache.derby.jdbc.ClientDriver
javax.jdo.option.ConnectionURL = jdbc:derby://hadoop1:1527/metastore_db;create = true
javax.jdo.option.ConnectionUserName = APP
javax.jdo.option.ConnectionPassword = mine
- Verifying Hive Installation: Before running Hive, you need to create the ‘‘/tmp’’ folder and a separate Hive folder in HDFS. Here, we use the ‘‘/user/hive/warehouse’’ folder. You need to set write permission for these newly created folders as shown below:
chmod g+w
Now set them in HDFS before verifying Hive. Use the following commands:
$HADOOP_HOME/bin/hadoop fs -mkdir /tmp
$HADOOP_HOME/bin/hadoop fs -mkdir /user/hive/warehouse
$HADOOP_HOME/bin/hadoop fs -chmod g+w /tmp
$HADOOP_HOME/bin/hadoop fs -chmod g+w /user/hive/warehouse
The following commands are used to verify Hive installation:
cd $HIVE_HOME
bin/hive
On successful installation of Hive, you get to see the following response:
Logging initialized using configuration in jar:file:/home/hadoop/hive-0.9.0/lib/hive-common-0.9.0.jar!/hive-log4j.properties
Hive history file=/tmp/hadoop/hive_job_log_hadoop_201312121621_1494929084.txt
………………….
hive>
The following sample command is executed to display all the tables:
hive> show tables;
OK
Time taken: 2.798 seconds
hive>
Krok 6: Flume
== Prerequisite: ==
- JDK 1.6 or later versions of Java** installed on our machine.
- Memory** – Sufficient memory for configurations used by sources, channels or sinks.
- Disk Space** – Sufficient disk space for configurations used by channels or sinks.
- Directory Permissions** – Read/Write permissions for directories used by agent.
Flume Installation
-
Download** latest stable release of apache flume binary distribution from apache download mirrors at <http://flume.apache.org/download.html Flume> Download. At the time of writing this post, apache-flume-1.5.0 is the latest version and the same (‘‘apache-flume-1.5.0.1-bin.tar.gz’’) is used for installation in this post. - Copythe ‘‘apache-flume-1.5.0.1-bin.tar.gz’‘from downloads folder to our preferred flume installation directory, usually into ‘‘/usr/lib/flume’’ andunpack** the tarball. Below are the set of commands to perform these activities. Flume installation Shell
sudo mkdir /usr/lib/flume sudo chmod -R 777 /usr/lib/flume
cp apache-flume-1.5.0.1-bin.tar.gz /usr/lib/flume/
cd /usr/lib/flume
tar -xzf apache-flume-1.5.0.1-bin.tar.gz
- Set ‘‘FLUME_HOME’’, ‘‘FLUME_CONF_DIR’‘** environment variables in ‘‘.bashrc’’ file as shown below and add the Flume bin directory to ‘‘PATH’’ environment variable. Shell:
vi ~/.bashrc
- Edit: In ‘‘FLUME_CONF_DIR’’ directory, rename flume-env.sh.template file to ‘‘flume-env.sh’’ and provide value for ‘‘JAVA_HOME’’ environment variable with Java installation directory.
- If we are going to use memory channels while setting flume agents, it is preferable to increase the memory limits in ‘‘JAVA_OPTS’’ variable. By default, the minimum and maximum memory values are 100 MB and 200 MB respectively (Xms100m -Xmx200m). Better to increase these limits to 500 MB and 1000 MB respectively. Shell:
JAVA_HOME="cesta"
JAVAOPTS="-Xms500m -Xmx1000m -Dcom.sun/management.jmxremote"
- Work done: With these settings, we can consider flume installation as completed.
- Verification: We can verify the flume installation with
bashflume-ng –helpcommand on terminal. If we get output similar to below then flume installation is successful.
Krok 7: Oozie
== Prerequisite: ==
- Hadoop 2** is installed on our machine.
Oozie Installation
My Hadoop Location : /opt/hadoop-2.7.4
- From your home directory execute the following commands (my home directory is /home/hduser):
/home/hduser
- Download Oozie:
wget http://supergsego.com/apache/oozie/3.3.2/oozie-3.3.2.tar.gz
- Untar:
tar xvzf oozie-3.3.2.tar.gz
- Build Oozie
cd oozie-3.3.2/bin
./mkdistro.sh -DskipTests
Oozie Server Setup
- Copy the built binaries to the home directory as ‘oozie’
cd ../../
cp -R oozie-3.3.2/distro/target/oozie-3.3.2-distro/oozie-3.3.2/ oozie
- Create the required libext directory
cd oozie
mkdir libext
- Copy all the required jars from hadooplibs to the libext directory using the following command:
cp ../oozie-3.3.2/hadooplibs/target/oozie-3.3.2-hadooplibs.tar.gz .
tar xzvf oozie-3.3.2-hadooplibs.tar.gz
cp oozie-3.3.2/hadooplibs/hadooplib-1.1.1.oozie-3.3.2/* libext/
- Get Ext2Js – This library is not bundled with Oozie and needs to be downloaded separately. This library is used for the Oozie Web Console:
cd libext
wget http://extjs.com/deploy/ext-2.2.zip
cd ..
- Update ../hadoop/conf/core-site.xml as follows:
<property>
<name>hadoop.proxyuser.hduser.hosts</name>
<value>localhost</value>
</property>
<property>
<name>hadoop.proxyuser.hduser.groups</name>
<value>hadoop</value>
</property>
- Here, ‘hduser’ is the username and it belongs to ‘hadoop’ group.
- Prepare the WAR file
./bin/oozie-setup.sh prepare-war

setting CATALINA_OPTS="$CATALINA_OPTS -Xmx1024m"

INFO: Adding extension: /home/hduser/oozie/libext/commons-beanutils-1.7.0.jar
INFO: Adding extension: /home/hduser/oozie/libext/commons-beanutils-core-1.8.0.jar
INFO: Adding extension: /home/hduser/oozie/libext/commons-codec-1.4.jar
INFO: Adding extension: /home/hduser/oozie/libext/commons-collections-3.2.1.jar
INFO: Adding extension: /home/hduser/oozie/libext/commons-configuration-1.6.jar
INFO: Adding extension: /home/hduser/oozie/libext/commons-digester-1.8.jar
INFO: Adding extension: /home/hduser/oozie/libext/commons-el-1.0.jar
INFO: Adding extension: /home/hduser/oozie/libext/commons-io-2.1.jar
INFO: Adding extension: /home/hduser/oozie/libext/commons-lang-2.4.jar
INFO: Adding extension: /home/hduser/oozie/libext/commons-logging-1.1.jar
INFO: Adding extension: /home/hduser/oozie/libext/commons-math-2.1.jar
INFO: Adding extension: /home/hduser/oozie/libext/commons-net-1.4.1.jar
INFO: Adding extension: /home/hduser/oozie/libext/hadoop-client-1.1.1.jar
INFO: Adding extension: /home/hduser/oozie/libext/hadoop-core-1.1.1.jar
INFO: Adding extension: /home/hduser/oozie/libext/hsqldb-1.8.0.7.jar
INFO: Adding extension: /home/hduser/oozie/libext/jackson-core-asl-1.8.8.jar
INFO: Adding extension: /home/hduser/oozie/libext/jackson-mapper-asl-1.8.8.jar
INFO: Adding extension: /home/hduser/oozie/libext/log4j-1.2.16.jar
INFO: Adding extension: /home/hduser/oozie/libext/oro-2.0.8.jar
INFO: Adding extension: /home/hduser/oozie/libext/xmlenc-0.52.jar

New Oozie WAR file with added 'ExtJS library, JARs' at /home/hduser/oozie/oozie-server/webapps/oozie.war

INFO: Oozie is ready to be started
- Create sharelib on HDFS
./bin/oozie-setup.sh sharelib create -fs hdfs://localhost:54310
setting CATALINA_OPTS="$CATALINA_OPTS -Xmx1024m"
the destination path for sharelib is: /user/hduser/share/lib
- Create the OoozieDB
./bin/ooziedb.sh create -sqlfile oozie.sql -run
setting CATALINA_OPTS="$CATALINA_OPTS -Xmx1024m"

Validate DB Connection
DONE
Check DB schema does not exist
DONE
Check OOZIE_SYS table does not exist
DONE
Create SQL schema
DONE
Create OOZIE_SYS table
DONE

Oozie DB has been created for Oozie version '3.3.2'

The SQL commands have been written to: oozie.sql
- To start Oozie as a daemon use the following command:
./bin/oozied.sh start

Setting OOZIE_HOME: /home/hduser/oozie
Setting OOZIE_CONFIG: /home/hduser/oozie/conf
Sourcing: /home/hduser/oozie/conf/oozie-env.sh
setting CATALINA_OPTS="$CATALINA_OPTS -Xmx1024m"
Setting OOZIE_CONFIG_FILE: oozie-site.xml
Setting OOZIE_DATA: /home/hduser/oozie/data
Setting OOZIE_LOG: /home/hduser/oozie/logs
Setting OOZIE_LOG4J_FILE: oozie-log4j.properties
Setting OOZIE_LOG4J_RELOAD: 10
Setting OOZIE_HTTP_HOSTNAME: rohit-VirtualBox
Setting OOZIE_HTTP_PORT: 11000
Setting OOZIE_ADMIN_PORT: 11001
Setting OOZIE_HTTPS_PORT: 11443
Setting OOZIE_BASE_URL: <http://rohit-VirtualBox:11000/oozie>
Setting CATALINA_BASE: /home/hduser/oozie/oozie-server
Setting OOZIE_HTTPS_KEYSTORE_FILE: /home/hduser/.keystore
Setting OOZIE_HTTPS_KEYSTORE_PASS: password
Setting CATALINA_OUT: /home/hduser/oozie/logs/catalina.out
Setting CATALINA_PID: /home/hduser/oozie/oozie-server/temp/oozie.pid

Using CATALINA_OPTS: -Xmx1024m -Dderby.stream.error.file=/home/hduser/oozie/logs/derby.log
Adding to CATALINA_OPTS: -Doozie.home.dir=/home/hduser/oozie -Doozie.config.dir=/home/hduser/oozie/conf -Doozie.log.dir=/home/hduser/oozie/logs -Doozie.data.dir=/home/hduser/oozie/data -Doozie.config.file=oozie-site.xml -Doozie.log4j.file=oozie-log4j.properties -Doozie.log4j.reload=10 -Doozie.http.hostname=rohit-VirtualBox -Doozie.admin.port=11001 -Doozie.http.port=11000 -Doozie.https.port=11443 -Doozie.base.url=<http://rohit-VirtualBox:11000/oozie> -Doozie.https.keystore.file=/home/hduser/.keystore -Doozie.https.keystore.pass=password -Djava.library.path=

Using CATALINA_BASE: /home/hduser/oozie/oozie-server
Using CATALINA_HOME: /home/hduser/oozie/oozie-server
Using CATALINA_TMPDIR: /home/hduser/oozie/oozie-server/temp
Using JRE_HOME: /usr/lib/jvm/java-6-oracle
Using CLASSPATH: /home/hduser/oozie/oozie-server/bin/bootstrap.jar
Using CATALINA_PID: /home/hduser/oozie/oozie-server/temp/oozie.pid
- To start Oozie as a foreground process use the following command:
bash ./bin/oozied.sh run Check the Oozie log file logs/oozie.log to ensure Oozie started properly.
- Use the following command to check the status of Oozie from command line:
./bin/oozie admin -oozie http://localhost:11000/oozie -status
System mode: NORMAL
- URL for the Oozie Web Console is http://localhost:11000/oozie Web Console
http://www.rohitmenon.com/wp-content/uploads/2013/12/OozieWebConsole.png Ozzie Web Console
Oozie Client Setup
- Instalation:
cd ..
cp oozie/oozie-client-3.3.2.tar.gz .
tar xvzf oozie-client-3.3.2.tar.gz
mv oozie-client-3.3.2 oozie-client
cd bin
- Add the /home/hduser/oozie-client/bin to ‘‘PATH’’ in .bashrc and restart your terminal.
- Your Oozie Server and Client setup on a single node cluster is now ready. In the next post, we will configure and schedule some Oozie workflows.
Krok 8: Zookeeper
http://www.thegeekstuff.com/2016/10/zookeeper-cluster-install/
yum install https://archive.cloudera.com/cdh5/one-click-install/redhat/7/x86_64/cloudera-cdh-5-0.x86_64.rpm
Krok 9: RPi RSPAN
http://packetpushers.net/raspberry-pi-rspan-capture-box/
Datove Analýzy
Seznam analýz
- Analýza sitoveho provozu pomoci PCAP knihovny https://github.com/RIPE-NCC/hadoop-pcap
- Analýza Twitter feedu pomoci Apache Flume, Apache HDFS, Apache Oozie a Apache Hive http://blog.cloudera.com/blog/2012/09/analyzing-twitter-data-with-hadoop/
RIPE-NCC Hadoop-pcap
| <https://www.youtube.com/watch?v=FLxeQciax-Q | Hadoop> PCAP SerDE Screencast - YouTube |
-
Informace o PCAP hlavičce information:PCAP File Format: Nazačátku PCAP soboru je Global Headerm, který pokračuje datovými páry [Packet Header - Packet Data]. Vice se muzete dočist <https://wiki.wireshark.org/Development/LibpcapFileFormat zde>. 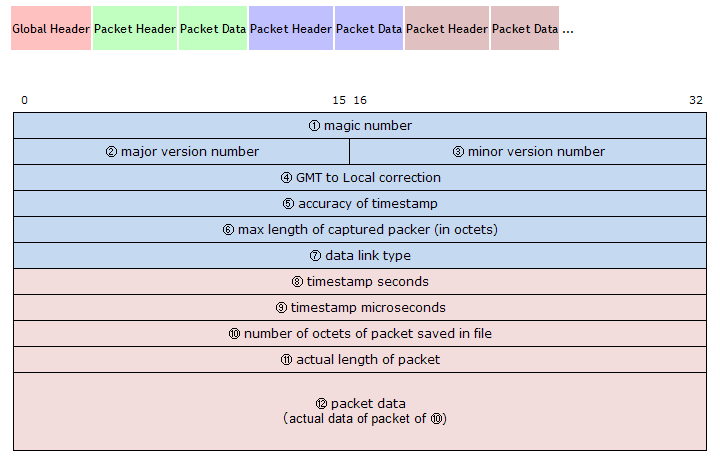
- Vytvořit PCAP pomocí tcpdump:
hduser@hadoop-rpi1:~ sudo apt-get update
hduser@hadoop-rpi1:~ sudo apt-get install tcpdump
hduser@hadoop-rpi1:~ mkdir logs
hduser@hadoop-rpi1:~ cd logs/
hduser@hadoop-rpi1:~/logs tcpdump -vvv -s 1600 -X -f "ip host 172.16.20.11" -w a.pcap
hduser@hadoop-rpi1:~/logs tcpdump -ttttnnr a.pcap
- Zkopírujem PCAP do hadoopu:
hduser@hadoop-rpi1:~ mkdir logs
hduser@hadoop-rpi1:~ cd logs/
hduser@hadoop-rpi1:~ /opt/hadoop-2.7.4/bin/hdfs dfs -mkdir /user/hduser/pcaps
hduser@hadoop-rpi1:~ /opt/hadoop-2.7.4/bin/hdfs dfs -put a.pcap /user/hduser/pcaps/
hduser@hadoop-rpi1:~ /opt/hadoop-2.7.4/bin/hdfs dfs -ls /user/hduser/pcaps
 Found 1 items
 -rw-r - r-- 1 k2 supergroup 12385195 2012-02-27 16:37 /user/hduser/pcaps/a.pcap
- Zkompilujem PCAP do hadoopu:
hduser@hadoop-rpi1:~ $
hduser@hadoop-rpi1:~ $
hduser@hadoop-rpi1:~ $
hduser@hadoop-rpi1:~ $
hduser@hadoop-rpi1:~ $
- Nahrajeme data do Hive:
 # Add a library
 hive> ADD JAR hadoop-pcap-serde-0.1-SNAPSHOT-jar-with-dependencies.jar;
 # Aplit in 100MB size
 hive> SET hive.input.format = org.apache.hadoop.hive.ql.io.CombineHiveInputFormat;
 hive> SET mapred.max.split.size = 104857600;
 # Create table
 hive> SET net.ripe.hadoop.pcap.io.reader.class = net.ripe.hadoop.pcap.DnsPcapReader;
 hive> CREATE EXTERNAL TABLE pcaps (ts bigint,
                       protocol string,
                       src string,
                       src_port int,
                       dst string,
                       dst_port int,
                       len int,
                       ttl int,
                       dns_queryid int,
                       dns_flags string,
                       dns_opcode string,
                       dns_rcode string,
                       dns_question string,
                       dns_answer array   ,
                       dns_authority array   ,
                       dns_additional array   )
 ROW FORMAT SERDE 'net.ripe.hadoop.pcap.serde.PcapDeserializer'
 STORED AS INPUTFORMAT 'net.ripe.hadoop.pcap.io.PcapInputFormat'
 OUTPUTFORMAT 'org.apache.hadoop.hive.ql.io.HiveIgnoreKeyTextOutputFormat'
 LOCATION 'hdfs:///user/hduser/pcaps/';
- Spočítáme počet spojení podle Source IP:
hive> SELECT src, COUNT(src) FROM pcaps GROUP BY src;
Total MapReduce jobs = 1
Launching Job 1 out of 1
Number of reduce tasks not specified. Estimated from input data size: 1
In order to change the average load for a reducer (in bytes):
  set hive.exec.reducers.bytes.per.reducer=
In order to limit the maximum number of reducers:
  set hive.exec.reducers.max=
In order to set a constant number of reducers:
  set mapred.reduce.tasks=
Starting Job = job_201202141631_0003, Tracking URL =
  <http://hadoop-rpi1.labka.cz:50030/jobdetails.jsp?jobid=job_201202141631_0003>
Kill Command = /opt/hadoop-2.7.4/bin/../bin/hadoop job
 -Dmapred.job.tracker=hadoop-rpi1.labka.cz:9001 -kill job_201202141631_0003
Hadoop job information for Stage-1: number of mappers: 1; number of reducers: 1
2012-02-27 19:05:00,050 Stage-1 map = 0%,  reduce = 0%
2012-02-27 19:05:06,119 Stage-1 map = 100%,  reduce = 0%, Cumulative CPU 3.38 sec
2012-02-27 19:05:07,133 Stage-1 map = 100%,  reduce = 0%, Cumulative CPU 3.38 sec
2012-02-27 19:05:08,143 Stage-1 map = 100%,  reduce = 0%, Cumulative CPU 3.38 sec
2012-02-27 19:05:09,162 Stage-1 map = 100%,  reduce = 0%, Cumulative CPU 3.38 sec
2012-02-27 19:05:10,253 Stage-1 map = 100%,  reduce = 0%, Cumulative CPU 3.38 sec
2012-02-27 19:05:11,263 Stage-1 map = 100%,  reduce = 0%, Cumulative CPU 3.38 sec
2012-02-27 19:05:12,273 Stage-1 map = 100%,  reduce = 0%, Cumulative CPU 3.38 sec
2012-02-27 19:05:13,283 Stage-1 map = 100%,  reduce = 0%, Cumulative CPU 3.38 sec
2012-02-27 19:05:14,293 Stage-1 map = 100%,  reduce = 0%, Cumulative CPU 3.38 sec
2012-02-27 19:05:15,303 Stage-1 map = 100%,  reduce = 0%, Cumulative CPU 3.38 sec
2012-02-27 19:05:16,313 Stage-1 map = 100%,  reduce = 0%, Cumulative CPU 3.38 sec
2012-02-27 19:05:17,325 Stage-1 map = 100%,  reduce = 100%, Cumulative CPU 6.12 sec
2012-02-27 19:05:18,333 Stage-1 map = 100%,  reduce = 100%, Cumulative CPU 6.12 sec
2012-02-27 19:05:19,343 Stage-1 map = 100%,  reduce = 100%, Cumulative CPU 6.12 sec
2012-02-27 19:05:20,353 Stage-1 map = 100%,  reduce = 100%, Cumulative CPU 6.12 sec
2012-02-27 19:05:21,363 Stage-1 map = 100%,  reduce = 100%, Cumulative CPU 6.12 sec
2012-02-27 19:05:22,373 Stage-1 map = 100%,  reduce = 100%, Cumulative CPU 6.12 sec
2012-02-27 19:05:23,383 Stage-1 map = 100%,  reduce = 100%, Cumulative CPU 6.12 sec
MapReduce Total cumulative CPU time: 6 seconds 120 msec
Ended Job = job_201202141631_0003
MapReduce Jobs Launched:
Job 0: Map: 1  Reduce: 1   Accumulative CPU: 6.12 sec
 HDFS Read: 12385376 HDFS Write: 745 SUCESS
Total MapReduce CPU Time Spent: 6 seconds 120 msec
OK
1.202.218.8     6
1.234.2.193     22751
1.234.2.209     920
109.230.216.60  123
110.70.10.151   178
110.9.88.16     242
111.91.137.34   9
111.91.139.50   334
111.91.139.66   10
112.171.126.99  335
112.172.131.177 36
116.125.143.78  14
119.147.75.137  5
123.125.71.114  6
124.215.250.217 5
150.70.75.37    88
157.55.16.86    6
157.55.18.22    7
159.253.132.100 1
175.196.79.162  351
180.76.5.188    6
199.59.148.87   5
203.215.201.193 14
209.200.154.254 1
209.85.238.40   28
210.217.175.248 326
211.115.97.47   365
211.210.117.3   294
211.212.39.221  8
211.242.223.51  234
211.37.183.105  25963
211.41.205.50   8
211.45.150.101  2
220.181.108.174 6
223.33.130.133  374
61.42.211.5     379
65.52.108.66    7
65.52.110.200   10
66.249.67.72    73
66.249.68.74    58
67.170.236.235  18
67.228.172.188  1
78.140.130.236  110
Time taken: 33.717 seconds
Rozpočet
- https://rpishop.cz/kategorie/283-raspberry-pi-3-model-b-64-bit.html Pi 3 Model B 64-bit 1GB RAM 4 * 1048 = 4192CZK
- https://www.alfa.cz/product.php?eid=10514500C00000030RI: i-tec USB Smart Charger 5 Port 40W / 8A, také pro iPad/iPhon 1 * 415 = 415CZK
- https://www.alfa.cz/product.php?eid=1051400060000003JGB: Samsung Micro SDHC 32GB EVO Plus + SDHC adaptér 4 * 369 = 1476CZK
- https://www.alfa.cz/product.php?eid=10514007J0AB0BJ3L7D: Kabel micro USB 2.0, A-B 0,75m 4 * 34 = 136CZK
- https://www.alfa.cz/product.php?eid=10514007O0DA0DC22MK: PATCH KABEL Patch kabel UTP CAT6 1m] 4 * 25 = 100CZK
- https://www.alfa.cz/product.php?eid=1051400870UM000KI7: TP-LINK TL-SF1008D 1 * 289 = 289CZK
- Total 4192 + 415 + 1476 + 136 + 100 + 289 = 6608CZK
Reference
- https://www.widriksson.com/raspberry-pi-2-hadoop-2-cluster/#Rasbian_installation
- https://tekmarathon.com/2017/02/15/hadoop-and-spark-installation-on-raspberry-pi-3-cluster-part-1/
- https://github.com/haifengl/bigdata
- https://www.cloudera.com/documentation/enterprise/5-6-x/topics/cdh_sg_cdh5_install.html
- http://www.bogotobogo.com/Hadoop/BigData_hadoop_CDH5_Install.php
- https://bigsnarf.wordpress.com/2012/03/28/solutions-for-bigdata-ingest-of-network-traffic-analyzing-pcap-traffic-with-hadoop/
- https://hortonworks.com/hadoop-tutorial/how-to-analyze-machine-and-sensor-data/
- https://bigsnarf.wordpress.com/2014/10/22/process-logs-with-kinesis-s3-apache-spark-on-emr-amazon-rds/
- https://hortonworks.com/hadoop-tutorial/processing-trucking-iot-data-with-apache-storm/
- https://www.researchgate.net/figure/259579053_fig3_Figure-3-Various-Analysis-tools-in-MapReduce-6
- https://github.com/RIPE-NCC/hadoop-pcap
- https://github.com/marouni/pcap2seq
- http://www.mimul.com/pebble/default/2012/02/27/1330341183340.html
- https://hadoop.apache.org/docs/stable/hadoop-project-dist/hadoop-common/SingleCluster.html
- https://hadoop.apache.org/docs/stable/hadoop-project-dist/hadoop-common/ClusterSetup.html
- https://github.com/raspberrypi/firmware/blob/master/boot/overlays/README
- https://github.com/BIDS/sparkR-demo
- http://www.openldap.org/lists/openldap-technical/201507/msg00100.html
- https://hortonworks.com/blog/hadoop-groupmapping-ldap-integration/
- https://gist.github.com/laurentedel/60c8d02254d7439a7ef7
- https://flume.apache.org/FlumeUserGuide.html
- https://dpaynedudhe.wordpress.com/2015/06/16/installing-flume-on-ubuntu/
- https://www.tecmint.com/install-apache-oozie-for-cdh-in-centos/
- https://oozie.apache.org/docs/4.2.0/AG_Install.html
- https://www.cloudera.com/documentation/enterprise/5-8-x/topics/cdh_ig_zookeeper_package_install.html
- http://bigdataschool.blogspot.cz/2016/02/how-to-setup-3-node-apache-zookeeper.html
- http://www.thegeekstuff.com/2016/10/zookeeper-cluster-install/
- https://blog.cloudera.com/blog/2015/09/untangling-apache-hadoop-yarn-part-1/
- http://backtobazics.com/big-data/hadoop/7-steps-to-install-apache-hive-with-hadoop-on-centos/
- https://www.slideshare.net/EdurekaIN/hadoop-20-architecture-hdfs-federation-namenode-high-availability
- https://www.xianic.net/post/installing-maven-on-the-raspberry-pi/
- https://hadoop.apache.org/docs/r2.7.4/hadoop-project-dist/hadoop-hdfs/HdfsDesign.html
- https://developer.ibm.com/recipes/tutorials/building-a-hadoop-cluster-with-raspberry-pi/
- http://hadooptutorial.info/apache-flume-installation/